做 Android 开发的同学们几乎没有不知道 OkHttp 这个网络请求库的了。这个库可以帮我们完成几乎所有类型的、涵盖几乎所有需求的网络请求。
它与大家耳熟能详的 LeakCanary、Retrofit 一样来自大名鼎鼎的 Square 公司,截至本文写下时,该库在 Github 上已有 43.7k 的 Start 数量。
一、OkHttp 解决了什么问题
从库的名字不难看出,OkHttp 解决的是网络问题。在 Android 开发中,网络问题自古以来便是开发者比较头疼的问题。
在互联网时代,几乎没有任何应用可以完全脱离互联网使用,良好的网络通信设计,对衡量一款 APP 的质量来说,无疑是尤为重要的加分项。
在上古时期(🙅♂️),Android 开发者们还在使用 HttpUrlConnection 来实现网络请求,不必引入三方代码,原始且简单。但也正是因为原始,一些高级功能就要自己实现。甚至在 Android2.2 之前还有 Bug,需要禁用连接池以正常使用 inputstream,所以 Google 接下来引入了 HttpClient。它解决了一些使用和维护上的问题,但这个库饱受开发者和维护者诟病,其属于 Apache 组织,API 复杂多变,并且不易扩展,所以被 Google 弃之敝屣。
于是一个易用、可维护、可拓展、稳定性高的网络请求库在此时就应运而生。它就是 OkHttp。
OkHttp 针对的不只是 Android,它对 Java 程序也有封装,其实从根本上来说,它是一个基于传输层(还记得网络的7层架构吗?)实现应用层协议的网络框架,而不仅是一个 Http 请求的库。
目前来说,很多公司都已经在使用 OkHttp 当做默认的网络请求库,一些著名的三方库也已经默认使用 OkHttp 来做网络请求,你在集成它的同时,它也会默默地帮你把 OkHttp 集成进项目中。
总的来说,OkHttp 解决的,就是网络开发中的各种 API 使用繁琐、可定制可拓展性不高、高级功能要自己造轮子的问题。
按照官方文档来看,它还提供了连接池,实现 GZIP 格式传输,重复请求的缓存等。并且新版的 OkHttp 已经支持 TLS1.3 协议(神马是TLS?),以及多 IP 地址轮询功能。OkHttp 提供丰富又简易的 API,支付同步/异步的调用,并且有着完善的回调机制供开发者使用。
二、代码结构
本文以 OkHttp 5.0.0-SNAPSHOT 代码做为示例。
Clone 一下 OkHttp 的源码,可以看到 OkHttp 的 module 有很多,如下图所示:
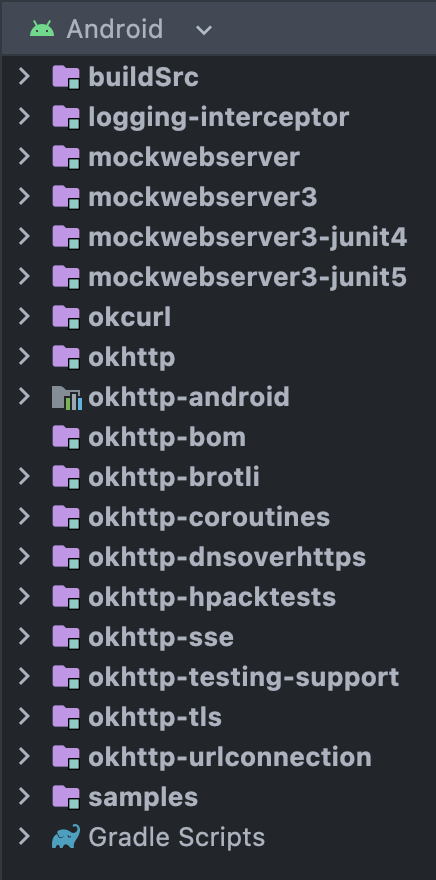
我们依次简单介绍一下各个 module。
buildSrc: 项目打包时的一些脚本,可以略过。logging-interceptor: 日志拦截器。负责记录网络请求和返回内容并打印日志,帮助记录与排查问题。使用方法如下:
implementation("com.squareup.okhttp3:logging-interceptor:4.10.0")
val logging = HttpLoggingInterceptor()
logging.setLevel(HttpLoggingInterceptor.Level.BASIC)
val client = OkHttpClient.Builder()
    .addInterceptor(logging)
    .build()
mockwebserver(3/3-juni4/3-junit5): 模拟服务器,一般用于本地的模拟 API 请求测试,针对不同的 junit 版本做出了适配。使用方法如下:
testImplementation("com.squareup.okhttp3:mockwebserver:4.10.0")
@Throws(Exception::class)
fun test() {
    // 创建 MokWebServer 的实例。每个单元测试都可以创建不同的实例。
    val server = MockWebServer()

    // 计划一些回应消息
    server.enqueue(MockResponse(body = "hello, world!"))
    server.enqueue(MockResponse(body = "sup, bra?"))
    server.enqueue(MockResponse(body = "yo dog"))

    // 启动服务
    server.start()

    val baseUrl: okhttp3.HttpUrl = server.url("/v1/chat/")

    // 模拟请求
    val chat = Chat(baseUrl)
    chat.loadMore()
    assertEquals("hello, world!", chat.messages())
    chat.loadMore()
    chat.loadMore()
    assertEquals(
    """
        hello, world!
        sup, bra?
        yo dog
        """.trimIndent(), chat.messages()
    )

    // 可选:确定你的应用请求了正确路径
    val request1 = server.takeRequest()
    assert("/v1/chat/messages/" == request1.path)
    assert(request1.getHeader("Authorization") != null)
    val request2 = server.takeRequest()
    assert("/v1/chat/messages/2" == request2.path)
    val request3 = server.takeRequest()
    assert("/v1/chat/messages/3" == request3.path)

    // 关闭服务
    server.shutdown()
}
这部分代码我们在之后会再进行介绍。
okcurl: 一些测试指令。okhttp: 核心代码,同时包含一些测试,是我们主要要阅读的部分。我们会在后面详细阅读。okhttp-android: 针对 Android 系统增加的一些文件,主要是一些 Extension 方法,以及 Android 上的 DNS 解析器。okhttp-bom: 针对 Gradle 的BOM(Bill-of-Materials)特性的编译脚本,能够让 gradle 支持如下写法:
dependencies {
    // define a BOM and its version
    implementation(platform("com.squareup.okhttp3:okhttp-bom:4.10.0"))

    // define any required OkHttp artifacts without version
    implementation("com.squareup.okhttp3:okhttp")
    implementation("com.squareup.okhttp3:logging-interceptor")
}
okhttp-brotli: 使用 Brotli 压缩算法 制作的拦截器。主要用来实现网络传输中的 GZip 压缩。它依赖了 brotli 库。使用方法如下:
implementation("com.squareup.okhttp3:okhttp-brotli:4.10.0")
val client = OkHttpClient.Builder()
    .addInterceptor(BrotliInterceptor.INSTANCE)
    .build()
okhttp-coroutines: 该 module 用来支持 Kotlin 的协程。okhttp-dnsoverhttps: 对 DNS over HTTPS 的实现。okhttp-hpacktests: 一些测试,用来验证 OkHttp 对于 HPACK 功能的实现。okhttp-sse: 实验性功能,可以接受服务端发送的事件。本质上是添加了Accept:text/event-stream的 Header 来实现的。但目前也只是实验性功能,实现方式随时可能变化。okhttp-testing-support: 供 OkHttp 工程内部使用的测试用例。okhttp-tls: 提供了一些让开发者可以使用 TLS 功能的 API。如 HeldCertificate 和 HandshakeCertificate。okhttp-urlconnection: 从java.net包中集成了Authenticator和CookieHandler。主要用于测试。samples: 一些使用例子。初次使用建议先从 Samples 看起,可以了解一些初级用法和高级用法。但大多数时候,官网的教程足以涵盖绝大多数需求。
三、OkHttp 是如何完成它的主要目标 —— 完成一次网络请求的
带着问题,我们来看代码。
第一步,我们先来整体看核心部分的代码。如下图所示:
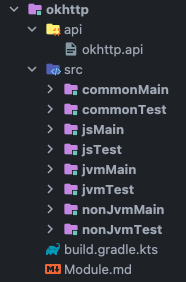
在 api 目录中有个 okhttp.api 文件,其内容如下:
public final class okhttp3/Address {
    public final fun -deprecated_certificatePinner ()Lokhttp3/CertificatePinner;
    public final fun -deprecated_connectionSpecs ()Ljava/util/List;
    public final fun -deprecated_dns ()Lokhttp3/Dns;
    public final fun -deprecated_hostnameVerifier ()Ljavax/net/ssl/HostnameVerifier;
    public final fun -deprecated_protocols ()Ljava/util/List;
    public final fun -deprecated_proxy ()Ljava/net/Proxy;
    public final fun -deprecated_proxyAuthenticator ()Lokhttp3/Authenticator;
    public final fun -deprecated_proxySelector ()Ljava/net/ProxySelector;
    public final fun -deprecated_socketFactory ()Ljavax/net/SocketFactory;
    public final fun -deprecated_sslSocketFactory ()Ljavax/net/ssl/SSLSocketFactory;
    public final fun -deprecated_url ()Lokhttp3/HttpUrl;
    public fun <init> (Ljava/lang/String;ILokhttp3/Dns;Ljavax/net/SocketFactory;Ljavax/net/ssl/SSLSocketFactory;Ljavax/net/ssl/HostnameVerifier;Lokhttp3/CertificatePinner;Lokhttp3/Authenticator;Ljava/net/Proxy;Ljava/util/List;Ljava/util/List;Ljava/net/ProxySelector;)V
    public final fun certificatePinner ()Lokhttp3/CertificatePinner;
    public final fun connectionSpecs ()Ljava/util/List;
    public final fun dns ()Lokhttp3/Dns;
    public fun equals (Ljava/lang/Object;)Z
    public fun hashCode ()I
    public final fun hostnameVerifier ()Ljavax/net/ssl/HostnameVerifier;
    public final fun protocols ()Ljava/util/List;
    public final fun proxy ()Ljava/net/Proxy;
    public final fun proxyAuthenticator ()Lokhttp3/Authenticator;
    public final fun proxySelector ()Ljava/net/ProxySelector;
    public final fun socketFactory ()Ljavax/net/SocketFactory;
    public final fun sslSocketFactory ()Ljavax/net/ssl/SSLSocketFactory;
    public fun toString ()Ljava/lang/String;
    public final fun url ()Lokhttp3/HttpUrl;
}
...
我只截取了其中一部分,这个文件是为了使用 goctl,以自动生成代码。类似的工具还有 Google 发明的 protobuf。有兴趣的可以去 goctl 的官网看一下。
第二步,我们从代码的入口开始看。
我们先来看看,平时在使用 OkHttp 时,是如何使用的:
val client = OkHttpClient()
val request = Request.Builder()
    .url("https://www.google.com")
    .build()

// 同步方法
try {
    val response = client.newCall(request).execute()
    print(response.body.string())
} catch (e: IOException) {
    e.printStackTrace()
}

// 异步回调方法
try {
    client.newCall(request).enqueue(object : Callback {
        override fun onFailure(call: Call, e: IOException) {
        }

        override fun onResponse(call: Call, response: Response) {
        }
    })
} catch (e: Exception) {
    e.printStackTrace()
}
先创建 OkHttpClient 实例,接着使用 Builder 模式构建一个 Request 实例,然后请求,得到结果。
我们一个个看,先看 OkHttpClient。
// okhttp3.OkHttpClient
/**
 * Factory for [calls][Call], which can be used to send HTTP requests and read their responses.
 *
 * ## OkHttpClients Should Be Shared
 *
 * OkHttp performs best when you create a single `OkHttpClient` instance and reuse it for all of
 * your HTTP calls. This is because each client holds its own connection pool and thread pools.
 * Reusing connections and threads reduces latency and saves memory. Conversely, creating a client
 * for each request wastes resources on idle pools.
 ..
**/
open class OkHttpClient internal constructor(
  builder: Builder
) : Call.Factory, WebSocket.Factory {
    @get:JvmName("dispatcher")
    val dispatcher: Dispatcher = builder.dispatcher  // 请求调度器

    ...
    constructor() : this(Builder())
    ...


    init {
        if (connectionSpecs.none { it.isTls }) {
            this.sslSocketFactoryOrNull = null
            this.certificateChainCleaner = null
            this.x509TrustManager = null
            this.certificatePinner = CertificatePinner.DEFAULT
        } else if (builder.sslSocketFactoryOrNull != null) {
            this.sslSocketFactoryOrNull = builder.sslSocketFactoryOrNull
            this.certificateChainCleaner = builder.certificateChainCleaner!!
            this.x509TrustManager = builder.x509TrustManagerOrNull!!
            this.certificatePinner = builder.certificatePinner.withCertificateChainCleaner(certificateChainCleaner!!)
        } else {
            this.x509TrustManager = Platform.get().platformTrustManager()
            this.sslSocketFactoryOrNull = Platform.get().newSslSocketFactory(x509TrustManager!!)
            this.certificateChainCleaner = CertificateChainCleaner.get(x509TrustManager!!)
            this.certificatePinner = builder.certificatePinner.withCertificateChainCleaner(certificateChainCleaner!!)
        }

        verifyClientState()
    }

    private fun verifyClientState() {
        check(null !in (interceptors as List<Interceptor?>)) {
            "Null interceptor: $interceptors"
        }
        check(null !in (networkInterceptors as List<Interceptor?>)) {
            "Null network interceptor: $networkInterceptors"
        }

        if (connectionSpecs.none { it.isTls }) {
            check(sslSocketFactoryOrNull == null)
            check(certificateChainCleaner == null)
            check(x509TrustManager == null)
            check(certificatePinner == CertificatePinner.DEFAULT)
        } else {
            checkNotNull(sslSocketFactoryOrNull) { "sslSocketFactory == null" }
            checkNotNull(certificateChainCleaner) { "certificateChainCleaner == null" }
            checkNotNull(x509TrustManager) { "x509TrustManager == null" }
        }
    }
}
我们看到,OkHttpClient 的构造函数中,调用了内部的一个 Builder 类。然后在 init 方法中进行了一些初始化与检查。
class Builder() {
    internal var dispatcher: Dispatcher = Dispatcher()
    internal var connectionPool: ConnectionPool = ConnectionPool()
    internal val interceptors: MutableList<Interceptor> = mutableListOf()
    internal val networkInterceptors: MutableList<Interceptor> = mutableListOf()
    internal var eventListenerFactory: EventListener.Factory = EventListener.NONE.asFactory()
    internal var retryOnConnectionFailure = true
    internal var fastFallback = true
    internal var authenticator: Authenticator = Authenticator.NONE
    internal var followRedirects = true
    internal var followSslRedirects = true
    internal var cookieJar: CookieJar = CookieJar.NO_COOKIES
    internal var cache: Cache? = null
    internal var dns: Dns = Dns.SYSTEM
    internal var proxy: Proxy? = null
    internal var proxySelector: ProxySelector? = null
    internal var proxyAuthenticator: Authenticator = Authenticator.NONE
    internal var socketFactory: SocketFactory = SocketFactory.getDefault()
    internal var sslSocketFactoryOrNull: SSLSocketFactory? = null
    internal var x509TrustManagerOrNull: X509TrustManager? = null
    internal var connectionSpecs: List<ConnectionSpec> = DEFAULT_CONNECTION_SPECS
    internal var protocols: List<Protocol> = DEFAULT_PROTOCOLS
    internal var hostnameVerifier: HostnameVerifier = OkHostnameVerifier
    internal var certificatePinner: CertificatePinner = CertificatePinner.DEFAULT
    internal var certificateChainCleaner: CertificateChainCleaner? = null
    internal var callTimeout = 0
    internal var connectTimeout = 10_000
    internal var readTimeout = 10_000
    internal var writeTimeout = 10_000
    internal var pingInterval = 0
    internal var minWebSocketMessageToCompress = RealWebSocket.DEFAULT_MINIMUM_DEFLATE_SIZE
    internal var routeDatabase: RouteDatabase? = null
    internal var taskRunner: TaskRunner? = null
    ...
}
在 Builder 的初始化中,赋值了各种内部成员变量的初始值。
接下来,Client 就会等待提交新的 Request。
/** Prepares the [request] to be executed at some point in the future. */
override fun newCall(request: Request): Call = RealCall(this, request, forWebSocket = false)
// okhttp3.internal.connection.RealCall

/**
 * Bridge between OkHttp's application and network layers. This class exposes high-level application
 * layer primitives: connections, requests, responses, and streams.
 *
 * This class supports [asynchronous canceling][cancel]. This is intended to have the smallest
 * blast radius possible. If an HTTP/2 stream is active, canceling will cancel that stream but not
 * the other streams sharing its connection. But if the TLS handshake is still in progress then
 * canceling may break the entire connection.
 */
class RealCall(
    val client: OkHttpClient,
    /** The application's original request unadulterated by redirects or auth headers. */
    val originalRequest: Request,
    val forWebSocket: Boolean
) : Call, Cloneable {
    ...
}
注释机翻:这个类是 OkHttp 的应用层和网络层之间的桥梁。它暴露了高级应用层的基本操作:连接、请求、响应和流。此类支持异步取消操作,旨在尽可能地减少影响范围。如果存在活跃的 HTTP/2 流,取消操作将取消该流,但不会影响共享同一连接的其他流。但是,如果 TLS 握手仍在进行中,则取消操作可能会中断整个连接。
说人话版:这个类的功能就是前面说的『它是一个基于传输层(还记得网络的7层架构吗?)实现应用层协议的网络框架』。它起到了一个承上启下的作用,为底层网络层与上层应用层进行连接,同时也有一些自己的小九九,比如支持异步取消等。
初始化完成后,如果是执行 execute() 方法,我们来看看是如何执行的:
override fun execute(): Response {
    // AtomicBoolean 保证原子操作的唯一性
    check(executed.compareAndSet(false, true)) { "Already Executed" }

    timeout.enter()
    callStart()
    try {
        // 将此次请求的信息交给 OkHttpClient 中的请求调度器
        client.dispatcher.executed(this)
        return getResponseWithInterceptorChain()
    } finally {
        client.dispatcher.finished(this)
    }
}

private fun callStart() {
    this.callStackTrace = Platform.get().getStackTraceForCloseable("response.body().close()")
    eventListener.callStart(this)
}
callStart() 方法用来设置事件回调,如果你设置了监听事件(比如使用了 logging-interceptor),在触发相应事件时就会得到回调。
然后 RealCall 对象就通过 client.dispatcher.executed(this) 被交给了 OkHttpClient 中的 Dispatcher:
// okhttp3.Dispatcher

/**
 * Policy on when async requests are executed.
 *
 * Each dispatcher uses an [ExecutorService] to run calls internally. If you supply your own
 * executor, it should be able to run [the configured maximum][maxRequests] number of calls
 * concurrently.
 */
class Dispatcher() {
    ...
    private var executorServiceOrNull: ExecutorService? = null

    @get:Synchronized
    @get:JvmName("executorService")
    val executorService: ExecutorService
        get() {
            if (executorServiceOrNull == null) {
                executorServiceOrNull = ThreadPoolExecutor(0, Int.MAX_VALUE, 60, TimeUnit.SECONDS,
                    SynchronousQueue(), threadFactory("$okHttpName Dispatcher", false)
                )
            }
            return executorServiceOrNull!!
        }

    /** Ready async calls in the order they'll be run. */
    private val readyAsyncCalls = ArrayDeque<AsyncCall>()

    /** Running asynchronous calls. Includes canceled calls that haven't finished yet. */
    private val runningAsyncCalls = ArrayDeque<AsyncCall>()

    /** Running synchronous calls. Includes canceled calls that haven't finished yet. */
    private val runningSyncCalls = ArrayDeque<RealCall>()

    constructor(executorService: ExecutorService) : this() {
        this.executorServiceOrNull = executorService
    }

    ...

    /** Used by [Call.execute] to signal it is in-flight. */
    @Synchronized
    internal fun executed(call: RealCall) {
        runningSyncCalls.add(call)
    }

    /** Used by [Call.execute] to signal completion. */
    internal fun finished(call: RealCall) {
        finished(runningSyncCalls, call)
    }

    private fun <T> finished(calls: Deque<T>, call: T) {
        val idleCallback: Runnable?
        synchronized(this) {
            if (!calls.remove(call)) throw AssertionError("Call wasn't in-flight!")
            idleCallback = this.idleCallback
        }

        val isRunning = promoteAndExecute()

        if (!isRunning && idleCallback != null) {
            idleCallback.run()
        }
    }
    ...
}
可以看到,Dispatcher 是一个基于 ExecutorService + ArrayDeque 实现的调度器,当有新的请求过来时,请求会被扔到 runningSyncCalls 中。而 executorService 是一个 0 核心线程,使用 SynchronousQueue 来做为工作队列的线程池。ArrayDeque 是 Java 中的标准类,是 Array Double Ended Queue 的缩写,它的功能是可以允许在数组的两端插入或移除元素。
接下来我们看看比较重要的 getResponseWithInterceptorChain():
@Throws(IOException::class)
internal fun getResponseWithInterceptorChain(): Response {
    // Build a full stack of interceptors.
    val interceptors = mutableListOf<Interceptor>()
    interceptors += client.interceptors    // 用户自定义的拦截器
    interceptors += RetryAndFollowUpInterceptor(client)     // 请求失败重试拦截器
    interceptors += BridgeInterceptor(client.cookieJar)     // 网络请求『桥梁』拦截器,该拦截器负责将网络请求传递到网络层,并根据网络层返回的数据生成 Response
    interceptors += CacheInterceptor(client.cache)          // 缓存拦截器,用于从缓存中读取请求,并将返回结果写入缓存
    interceptors += ConnectInterceptor                      // 开启向目标服务器的链接,然后继续传递向下一个拦截器
    if (!forWebSocket) {
        interceptors += client.networkInterceptors          // 如果是 webSocket 请求,则要添加对应的拦截器
    }
    interceptors += CallServerInterceptor(forWebSocket)     // 这是最后一个拦截器,用于给服务器疯狂打Call(大雾)

    val chain = RealInterceptorChain(                       // 拦截器链
        call = this,
        interceptors = interceptors,
        index = 0,
        exchange = null,                                    // 在 RealInterceptorChain 的注释中提到,如果该拦截器链是给应用层的,那么 exchange 必须为 null;如果该拦截器链是给网络层的,那必须不为 null。
        request = originalRequest,
        connectTimeoutMillis = client.connectTimeoutMillis,
        readTimeoutMillis = client.readTimeoutMillis,
        writeTimeoutMillis = client.writeTimeoutMillis
    )

    var calledNoMoreExchanges = false
    try {
        val response = chain.proceed(originalRequest)       // 开始链式处理
        if (isCanceled()) {
            response.closeQuietly()
            throw IOException("Canceled")
        }
        return response
    } catch (e: IOException) {
        calledNoMoreExchanges = true
        throw noMoreExchanges(e) as Throwable
    } finally {
        if (!calledNoMoreExchanges) {
            noMoreExchanges(null)
        }
    }
}
该方法加入了很多默认的拦截器(interceptor),以及开发者自定义的拦截器(client.interceptors),拦截器类的定义如下:
/**
 * Observes, modifies, and potentially short-circuits requests going out and the corresponding
 * responses coming back in. Typically interceptors add, remove, or transform headers on the request
 * or response.
 *
 * Implementations of this interface throw [IOException] to signal connectivity failures. This
 * includes both natural exceptions such as unreachable servers, as well as synthetic exceptions
 * when responses are of an unexpected type or cannot be decoded.
 *
 * Other exception types cancel the current call:
 *
 *  * For synchronous calls made with [Call.execute], the exception is propagated to the caller.
 *
 *  * For asynchronous calls made with [Call.enqueue], an [IOException] is propagated to the caller
 *    indicating that the call was canceled. The interceptor's exception is delivered to the current
 *    thread's [uncaught exception handler][Thread.UncaughtExceptionHandler]. By default this
 *    crashes the application on Android and prints a stacktrace on the JVM. (Crash reporting
 *    libraries may customize this behavior.)
 *
 * A good way to signal a failure is with a synthetic HTTP response:
 *
 * ```
 *   @Throws(IOException::class)
 *   override fun intercept(chain: Interceptor.Chain): Response {
 *     if (myConfig.isInvalid()) {
 *       return Response.Builder()
 *           .request(chain.request())
 *           .protocol(Protocol.HTTP_1_1)
 *           .code(400)
 *           .message("client config invalid")
 *           .body("client config invalid".toResponseBody(null))
 *           .build()
 *     }
 *
 *     return chain.proceed(chain.request())
 *   }
 * ```
 */
fun interface Interceptor {
  @Throws(IOException::class)
  fun intercept(chain: Chain): Response

  companion object {
    /**
     * Constructs an interceptor for a lambda. This compact syntax is most useful for inline
     * interceptors.
     *
     * val interceptor = Interceptor { chain: Interceptor.Chain ->
     *     chain.proceed(chain.request())
     * }
     *
     */
    inline operator fun invoke(crossinline block: (chain: Chain) -> Response): Interceptor =
      Interceptor { block(it) }
  }

  interface Chain {
    fun request(): Request

    @Throws(IOException::class)
    fun proceed(request: Request): Response

    /**
     * 返回要执行的请求的 Connection 对象,只对网络层拦截器有效,对应用层拦截器永远返回 null。
     */
    fun connection(): Connection?

    fun call(): Call

    fun connectTimeoutMillis(): Int

    fun withConnectTimeout(timeout: Int, unit: TimeUnit): Chain

    fun readTimeoutMillis(): Int

    fun withReadTimeout(timeout: Int, unit: TimeUnit): Chain

    fun writeTimeoutMillis(): Int

    fun withWriteTimeout(timeout: Int, unit: TimeUnit): Chain
  }
}
每一个自定义的拦截器需要覆盖 intercept(chain: Chain) 方法,同时在返回值里调用 chain.proceed(chain.request()) 来将当前的 Request 对象交给下一个拦截器。这形成了一个拦截器链。因此,拦截器添加的顺序很重要。
顺带提一下,这种设计模式的名字叫责任链模式。
责任链模式是一种行为设计模式, 允许你将请求沿着处理者链进行发送。 收到请求后, 每个处理者均可对请求进行处理, 或将其传递给链上的下个处理者。有兴趣可以看看[这里](https://refactoringguru.cn/design-patterns/chain-of-responsibility)

我们看三个比较重要的拦截器:BridgeInterceptor、ConnectInterceptor 和 CallServerInterceptor。
// okhttp3.internal.http.BridgeInterceptor

/**
 * Bridges from application code to network code. First it builds a network request from a user
 * request. Then it proceeds to call the network. Finally it builds a user response from the network
 * response.
 *
 * 机翻:应用代码与网络代码之间的桥梁。它会从用户的 Request 中先创建一个网络 Request,然后给网络层疯狂打 Call,最后将网络层的返回打包成一个用户所需的 Response。
 */
class BridgeInterceptor(private val cookieJar: CookieJar) : Interceptor {

    @Throws(IOException::class)
    override fun intercept(chain: Interceptor.Chain): Response {
        val userRequest = chain.request()
        val requestBuilder = userRequest.newBuilder()

        val body = userRequest.body
        if (body != null) {
            val contentType = body.contentType()
            if (contentType != null) {
                requestBuilder.header("Content-Type", contentType.toString())
            }

            val contentLength = body.contentLength()
            if (contentLength != -1L) {
                requestBuilder.header("Content-Length", contentLength.toString())
                requestBuilder.removeHeader("Transfer-Encoding")
            } else {
                requestBuilder.header("Transfer-Encoding", "chunked")
                requestBuilder.removeHeader("Content-Length")
            }
        }

        if (userRequest.header("Host") == null) {
            requestBuilder.header("Host", userRequest.url.toHostHeader())
        }

        if (userRequest.header("Connection") == null) {
            requestBuilder.header("Connection", "Keep-Alive")
        }

        // If we add an "Accept-Encoding: gzip" header field we're responsible for also decompressing
        // the transfer stream.
        var transparentGzip = false
        if (userRequest.header("Accept-Encoding") == null && userRequest.header("Range") == null) {
            transparentGzip = true
            requestBuilder.header("Accept-Encoding", "gzip")
        }

        val cookies = cookieJar.loadForRequest(userRequest.url)
        if (cookies.isNotEmpty()) {
            requestBuilder.header("Cookie", cookieHeader(cookies))
        }

        if (userRequest.header("User-Agent") == null) {
            requestBuilder.header("User-Agent", userAgent)
        }

        val networkRequest = requestBuilder.build()

        ////// 1️⃣ 此处代码暂停向下进行,先将请求传递给下一个拦截器处理
        val networkResponse = chain.proceed(networkRequest)

        cookieJar.receiveHeaders(networkRequest.url, networkResponse.headers)

        val responseBuilder = networkResponse.newBuilder()
            .request(networkRequest)

        if (transparentGzip &&
            "gzip".equals(networkResponse.header("Content-Encoding"), ignoreCase = true) &&
            networkResponse.promisesBody()
        ) {
            val responseBody = networkResponse.body
            if (responseBody != null) {
                val gzipSource = GzipSource(responseBody.source())
                val strippedHeaders = networkResponse.headers.newBuilder()
                    .removeAll("Content-Encoding")
                    .removeAll("Content-Length")
                    .build()
                responseBuilder.headers(strippedHeaders)
                val contentType = networkResponse.header("Content-Type")
                responseBuilder.body(RealResponseBody(contentType, -1L, gzipSource.buffer()))
            }
        }

        return responseBuilder.build()
    }

    /** Returns a 'Cookie' HTTP request header with all cookies, like `a=b; c=d`. */
    private fun cookieHeader(cookies: List<Cookie>): String = buildString {
        cookies.forEachIndexed { index, cookie ->
            if (index > 0) append("; ")
            append(cookie.name).append('=').append(cookie.value)
        }
    }
}
在 1️⃣ 处,我们可以看到,Request 被添加了一些 Headers 后,暂时交给了下一个拦截器,从拦截器的顺序来看,是 CacheInterceptor:
//okhttp3.internal.cache

/** Serves requests from the cache and writes responses to the cache. */
class CacheInterceptor(internal val cache: Cache?) : Interceptor {

    @Throws(IOException::class)
    override fun intercept(chain: Interceptor.Chain): Response {
        val call = chain.call()
        val cacheCandidate = cache?.get(chain.request())

        val now = System.currentTimeMillis()

        val strategy = CacheStrategy.Factory(now, chain.request(), cacheCandidate).compute()
        val networkRequest = strategy.networkRequest
        val cacheResponse = strategy.cacheResponse

        cache?.trackResponse(strategy)
        val listener = (call as? RealCall)?.eventListener ?: EventListener.NONE

        if (cacheCandidate != null && cacheResponse == null) {
            // The cache candidate wasn't applicable. Close it.
            cacheCandidate.body.closeQuietly()
        }

        // If we're forbidden from using the network and the cache is insufficient, fail.
        if (networkRequest == null && cacheResponse == null) {
            return Response.Builder()
                .request(chain.request())
                .protocol(Protocol.HTTP_1_1)
                .code(HTTP_GATEWAY_TIMEOUT)
                .message("Unsatisfiable Request (only-if-cached)")
                .sentRequestAtMillis(-1L)
                .receivedResponseAtMillis(System.currentTimeMillis())
                .build().also {
                    listener.satisfactionFailure(call, it)
                }
        }

        // If we don't need the network, we're done.
        if (networkRequest == null) {
            return cacheResponse!!.newBuilder()
                .cacheResponse(cacheResponse.stripBody())
                .build().also {
                    listener.cacheHit(call, it)
                }
        }

        if (cacheResponse != null) {
            listener.cacheConditionalHit(call, cacheResponse)
        } else if (cache != null) {
            listener.cacheMiss(call)
        }

        var networkResponse: Response? = null
        try {
            ////// 2️⃣ 此处交给下一个拦截器
            networkResponse = chain.proceed(networkRequest)
        } finally {
            // If we're crashing on I/O or otherwise, don't leak the cache body.
            if (networkResponse == null && cacheCandidate != null) {
                cacheCandidate.body.closeQuietly()
            }
        }

        // If we have a cache response too, then we're doing a conditional get.
        if (cacheResponse != null) {
            if (networkResponse?.code == HTTP_NOT_MODIFIED) {
                val response = cacheResponse.newBuilder()
                    .headers(combine(cacheResponse.headers, networkResponse.headers))
                    .sentRequestAtMillis(networkResponse.sentRequestAtMillis)
                    .receivedResponseAtMillis(networkResponse.receivedResponseAtMillis)
                    .cacheResponse(cacheResponse.stripBody())
                    .networkResponse(networkResponse.stripBody())
                    .build()

                networkResponse.body.close()

                // Update the cache after combining headers but before stripping the
                // Content-Encoding header (as performed by initContentStream()).
                cache!!.trackConditionalCacheHit()
                cache.update(cacheResponse, response)
                return response.also {
                    listener.cacheHit(call, it)
                }
            } else {
                cacheResponse.body.closeQuietly()
            }
        }

        val response = networkResponse!!.newBuilder()
            .cacheResponse(cacheResponse?.stripBody())
            .networkResponse(networkResponse.stripBody())
            .build()

        if (cache != null) {
            if (response.promisesBody() && CacheStrategy.isCacheable(response, networkRequest)) {
                // Offer this request to the cache.
                val cacheRequest = cache.put(response)
                return cacheWritingResponse(cacheRequest, response).also {
                    if (cacheResponse != null) {
                        // This will log a conditional cache miss only.
                        listener.cacheMiss(call)
                    }
                }
            }

            if (HttpMethod.invalidatesCache(networkRequest.method)) {
                try {
                    cache.remove(networkRequest)
                } catch (_: IOException) {
                    // The cache cannot be written.
                }
            }
        }

        return response
    }

    /**
     * Returns a new source that writes bytes to [cacheRequest] as they are read by the source
     * consumer. This is careful to discard bytes left over when the stream is closed; otherwise we
     * may never exhaust the source stream and therefore not complete the cached response.
     */
    @Throws(IOException::class)
    private fun cacheWritingResponse(cacheRequest: CacheRequest?, response: Response): Response {
        ...
    }

    ...
}
在 2️⃣ 处交给下一个拦截器 ConnectInterceptor:
// okhtp3.internal.connection

/**
 * Opens a connection to the target server and proceeds to the next interceptor. The network might
 * be used for the returned response, or to validate a cached response with a conditional GET.
 */
object ConnectInterceptor : Interceptor {
    @Throws(IOException::class)
    override fun intercept(chain: Interceptor.Chain): Response {
        val realChain = chain as RealInterceptorChain
        val exchange = realChain.call.initExchange(realChain)
        val connectedChain = realChain.copy(exchange = exchange)
        val result = connectedChain.proceed(realChain.request)
        return result
    }
}
别看就短短几行代码,该拦截器执行了几个重要的操作:
realChain.call.initExchange(realChain)这句话调用的是RealCall中的initExchange()方法,创建了一个Exchange实例exchange;- 重新生成一个
RealInterceptorChain实例,并将上一步的exchange扔进去; - 使用新生成的拦截器链,将请求传递给下一个拦截器。
// okhttp3.internal.connection.RealCall
/** Finds a new or pooled connection to carry a forthcoming request and response. */
// 找到一个新的或者已经在池里的连接,用来承载即将到来的请求和响应
internal fun initExchange(chain: RealInterceptorChain): Exchange {
    synchronized(this) {
        check(expectMoreExchanges) { "released" }
        check(!responseBodyOpen)
        check(!requestBodyOpen)
    }

    val exchangeFinder = this.exchangeFinder!!
    val connection = exchangeFinder.find()
    val codec = connection.newCodec(client, chain)
    val result = Exchange(this, eventListener, exchangeFinder, codec)
    this.interceptorScopedExchange = result
    this.exchange = result
    synchronized(this) {
        this.requestBodyOpen = true
        this.responseBodyOpen = true
    }

    if (canceled) throw IOException("Canceled")
    return result
}
Exchange 类的作用是使用特定的编码器,将数据写入流;或使用解码器,从流中读出数据:
/**
 * Transmits a single HTTP request and a response pair. This layers connection management and events
 * on [ExchangeCodec], which handles the actual I/O.
 * 机翻:持有一个 HTTP 请求和响应的『对』。进行连接管理和事件处理,是真正的 I/O 部分。
 */
class Exchange(
  internal val call: RealCall,
  internal val eventListener: EventListener,
  internal val finder: ExchangeFinder,
  private val codec: ExchangeCodec
) {
    ...

    fun writeRequestHeaders(request: Request) {
        try {
            eventListener.requestHeadersStart(call)
            codec.writeRequestHeaders(request)
            eventListener.requestHeadersEnd(call, request)
        } catch (e: IOException) {
            eventListener.requestFailed(call, e)
            trackFailure(e)
            throw e
        }
    }

    fun createRequestBody(request: Request, duplex: Boolean): Sink {
        ...
        eventListener.requestBodyStart(call)
        val rawRequestBody = codec.createRequestBody(request, contentLength)
        ...
    }

    fun flushRequest() {
        try {
            codec.flushRequest()
        } catch (e: IOException) {
            eventListener.requestFailed(call, e)
            trackFailure(e)
            throw e
        }
    }
    ...
}
可以看到,真正的工作是交给了 ExchangeCodec 去完成的,我们再来看看 ExchangeCodec:
/** Encodes HTTP requests and decodes HTTP responses. */
interface ExchangeCodec {
    /** Returns an output stream where the request body can be streamed. */
    @Throws(IOException::class)
    fun createRequestBody(request: Request, contentLength: Long): Sink

    /** This should update the HTTP engine's sentRequestMillis field. */
    @Throws(IOException::class)
    fun writeRequestHeaders(request: Request)

    ...
}
不出意外的,ExchangeCode 是一个接口,因为针对不同的 HTTP 版本,需要有不同的编/解码器。我们使用 Android Studio 的小功能来看看都有哪几个实现:

我们不再缀述这两种方式的实现,只拿 Http2ExchangeCodec 为例简单说一下。Http2ExchangeCodec 会按照 HTTP2 的协议方式,使用二进制格式进行传输。并且在底层的代码中,引用了 Square 自家的 [okio](https://square.github.io/okio/) 库。
接下来,按照上面拦截器的反向顺序,将 Response 一步步返回给上层。
可以用一张图来总结拦截器的流程:
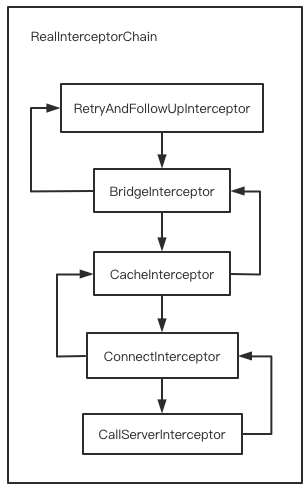
四、我们从这个库里可以学到什么
Okhttp 最核心的点就是拦截链,这个有点类似 rxJava 的核心点链式调用。拦截链模式在平时开发中的应用场景还是有的,比如我需要连续请求几个 API 获取最终结果,就不再需要各种回调,而且链条上的每个节点都可以有自己的逻辑。