View的绘制流程
View树的绘制流程
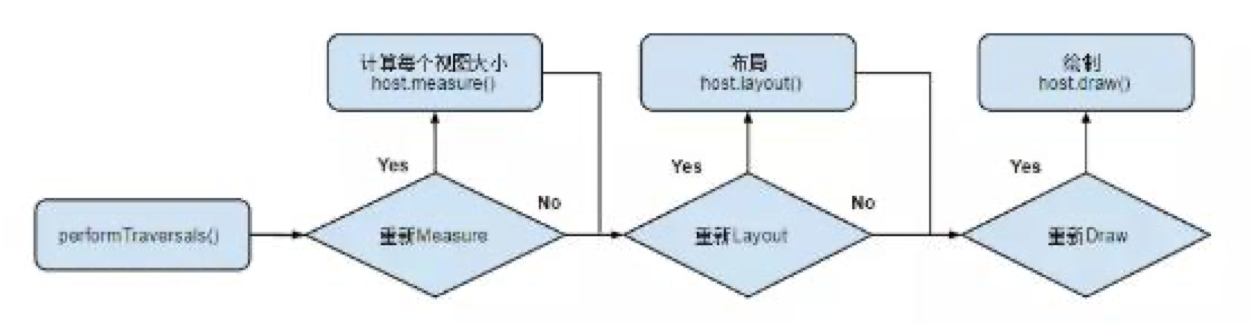
当 Activity 接收到焦点的时候,它会被请求绘制布局。该请求由 Android Framework 处理。绘制是从根节点开始,对布局树进行 measure 和 draw。整个 View 树的绘图流程在 ViewRoot 类的performTraversals()函数展开,该函数所做的工作可简单概况为是否需要重新计算视图大小(measure)、是否需要重新安置视图的位置(layout)、以及是否需要重绘(draw),流程图如下:
View 绘制流程函数调用链
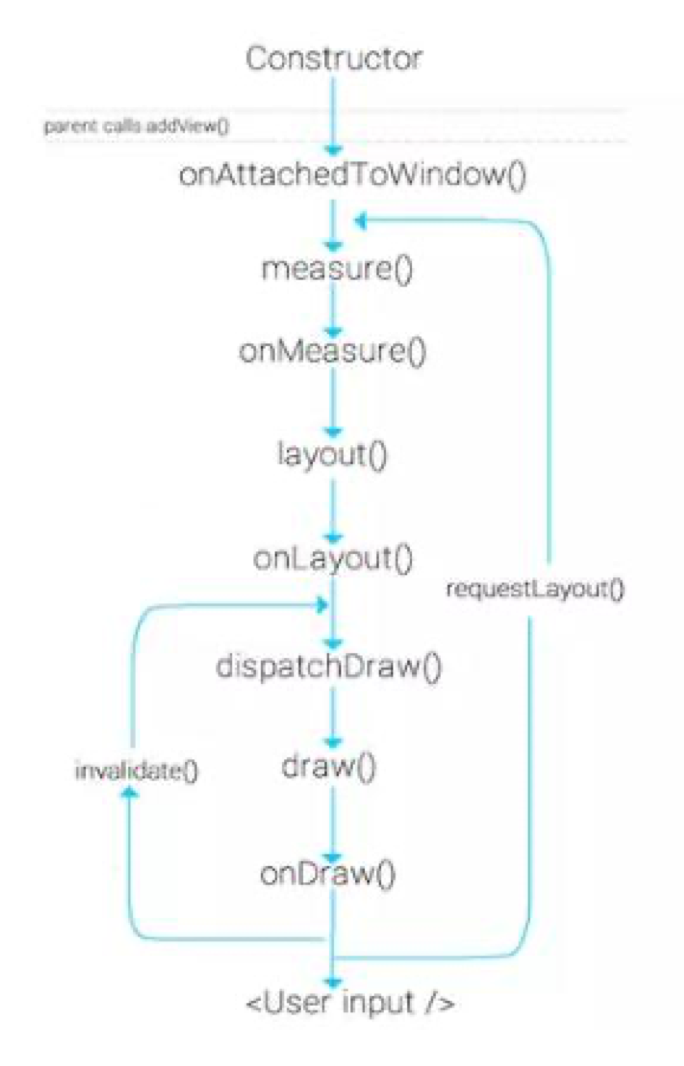
值得注意的是,用户主动调用invalidate()请求重绘 View 树,即 draw 过程,假如视图发生大小没有变化就不会调用layout(),并且只绘制那些调用了invalidate()方法的 View。
但是当布局变化的时候,比如方向变化,尺寸的变化,会调用requestLayout()方法。在自定义的视图中,如果某些情况下希望重新测量尺寸大小,应该手动去调用该方法,它会触发measure()和layout(),但不会进行draw。
从整体上来看Measure和Layout两个步骤的执行:
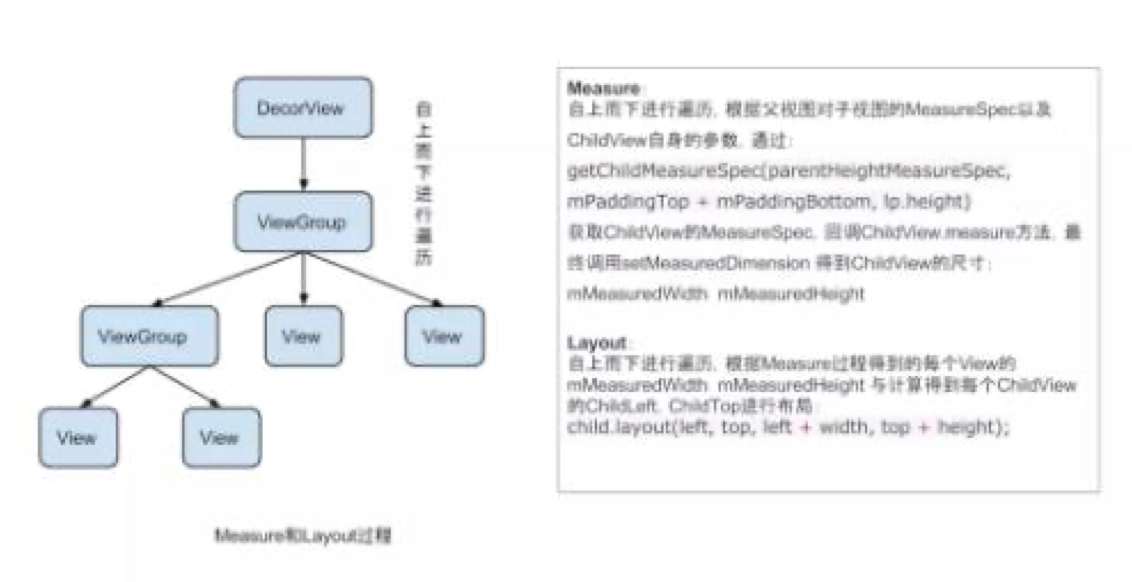
树的遍历是有序的,由父视图到子视图,每一个ViewGroup负责测绘它所有的子视图,而最底层的View会负责测绘自身。
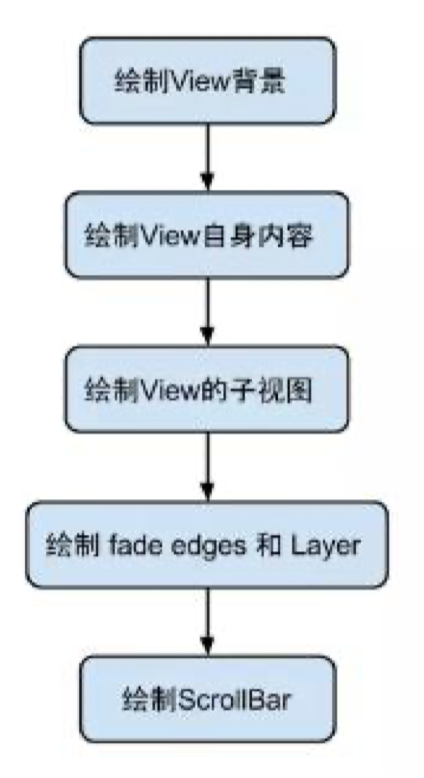
Draw的执行流程:
Measure过程分析
measure过程是在调用measure(int, int)方法,从上到下有序的测量View,在measure过程的最后,每个视图存储了自己的尺寸大小和测量规格。
layout过程是在调用layout(int, int, int, int)方法,也是自上而下进行遍历。在该过程中,每个父视图会根据measure过程得到的尺寸来摆放自己的子视图。
measure过程会为一个View及所有子节点的mMeasuredWidth和mMeasuredHeight变量赋值,该值可以通过 getMeasuredWidth()和getMeasuredHeight()方法获得。而且这两个值必须在父View约束范围之内,这样才可以保证所有的父View都接收所有子View的测量。如果子View对于measure得到的大小不满意的时候,父View会介入并设置测量规则进行第二次measure。
比如,父View可以先根据未给定的dimension去测量每一个子View,如果最终子View的未约束尺寸太大或者太小的时候,父View就会使用一个确切的大小再次对子View进行measure。
根据上面的流程,我们来看看源码:
    /**
     * 告诉所有子 view:给你们个 MeasureSpec,去自个儿测量自个儿的大小切!
     * PS: 如果谁的状态是 GONE,那你们就别搞了!
     *
     * @param widthMeasureSpec
     * @param heightMeasureSpec
     */
    protected void measureChildren(int widthMeasureSpec, int heightMeasureSpec) {
        final int size = mChildrenCount;
        final View[] children = mChildren;
        for (int i = 0; i < size; ++i) {
            final View child = children[i];
            if ((child.mViewFlags & VISIBILITY_MASK) != GONE) {
                measureChild(child, widthMeasureSpec, heightMeasureSpec);
            }
        }
    }
看看measureChild是如何做的:
    /**
     * 调用子 view 的 measure 方法来测量,根据父类的给的 MeasureSpec 和自己的 padding 值,
     * 让 getChildMeasureSpec() 去获取具体的 MeasureSpec。
     *
     * @param child
     * @param parentWidthMeasureSpec
     * @param parentHeightMeasureSpec
     */
    protected void measureChild(View child, int parentWidthMeasureSpec,
            int parentHeightMeasureSpec) {
        final LayoutParams lp = child.getLayoutParams();

        final int childWidthMeasureSpec = getChildMeasureSpec(parentWidthMeasureSpec,
                mPaddingLeft + mPaddingRight, lp.width);
        final int childHeightMeasureSpec = getChildMeasureSpec(parentHeightMeasureSpec,
                mPaddingTop + mPaddingBottom, lp.height);

        child.measure(childWidthMeasureSpec, childHeightMeasureSpec);
    }
最复杂的工作:getChildMeasureSpec():
    /**
     * 简单来说,就是根据某个方向的 父view 的 MeasureSpec 的值和 padding 和 childDimension,
     * 来决定这个 view 的 MeasureSpec: 一个int值
     *
     * @param spec The requirements for this view
     * @param padding The padding of this view for the current dimension and
     *        margins, if applicable
     * @param childDimension How big the child wants to be in the current
     *        dimension
     * @return a MeasureSpec integer for the child
     */
    public static int getChildMeasureSpec(int spec, int padding, int childDimension) {
        int specMode = MeasureSpec.getMode(spec);
        int specSize = MeasureSpec.getSize(spec);

        int size = Math.max(0, specSize - padding);

        int resultSize = 0;
        int resultMode = 0;

        switch (specMode) {
        // Parent has imposed an exact size on us
        case MeasureSpec.EXACTLY:
            if (childDimension >= 0) {
                resultSize = childDimension;
                resultMode = MeasureSpec.EXACTLY;
            } else if (childDimension == LayoutParams.MATCH_PARENT) {
                // Child wants to be our size. So be it.
                resultSize = size;
                resultMode = MeasureSpec.EXACTLY;
            } else if (childDimension == LayoutParams.WRAP_CONTENT) {
                // Child wants to determine its own size. It can't be
                // bigger than us.
                resultSize = size;
                resultMode = MeasureSpec.AT_MOST;
            }
            break;

        // Parent has imposed a maximum size on us
        case MeasureSpec.AT_MOST:
            if (childDimension >= 0) {
                // Child wants a specific size... so be it
                resultSize = childDimension;
                resultMode = MeasureSpec.EXACTLY;
            } else if (childDimension == LayoutParams.MATCH_PARENT) {
                // Child wants to be our size, but our size is not fixed.
                // Constrain child to not be bigger than us.
                resultSize = size;
                resultMode = MeasureSpec.AT_MOST;
            } else if (childDimension == LayoutParams.WRAP_CONTENT) {
                // Child wants to determine its own size. It can't be
                // bigger than us.
                resultSize = size;
                resultMode = MeasureSpec.AT_MOST;
            }
            break;

        // Parent asked to see how big we want to be
        case MeasureSpec.UNSPECIFIED:
            if (childDimension >= 0) {
                // Child wants a specific size... let him have it
                resultSize = childDimension;
                resultMode = MeasureSpec.EXACTLY;
            } else if (childDimension == LayoutParams.MATCH_PARENT) {
                // Child wants to be our size... find out how big it should
                // be
                resultSize = View.sUseZeroUnspecifiedMeasureSpec ? 0 : size;
                resultMode = MeasureSpec.UNSPECIFIED;
            } else if (childDimension == LayoutParams.WRAP_CONTENT) {
                // Child wants to determine its own size.... find out how
                // big it should be
                resultSize = View.sUseZeroUnspecifiedMeasureSpec ? 0 : size;
                resultMode = MeasureSpec.UNSPECIFIED;
            }
            break;
        }
        //noinspection ResourceType
        return MeasureSpec.makeMeasureSpec(resultSize, resultMode);
    }
获取到了子view的MeasureSpec,然后就会进入 View.java:
    /**
     * 调用该方法来获取一个view到底该有多大。父视图提供width与height约束信息
     *
     * 测量过程中,实际的测量结果会由 onMeasure(int, int) 这个方法返回。
     * 也就是说,只有 onMeasure(int, int) 这个方法能被子类覆写。
     *
     * @param widthMeasureSpec 水平方向父类强加的Measure需求
     * @param heightMeasureSpec 垂直方向父类强加的Measure需求
     *
     */
    public final void measure(int widthMeasureSpec, int heightMeasureSpec) {
        boolean optical = isLayoutModeOptical(this);
        if (optical != isLayoutModeOptical(mParent)) {
            Insets insets = getOpticalInsets();
            int oWidth  = insets.left + insets.right;
            int oHeight = insets.top  + insets.bottom;
            widthMeasureSpec  = MeasureSpec.adjust(widthMeasureSpec,  optical ? -oWidth  : oWidth);
            heightMeasureSpec = MeasureSpec.adjust(heightMeasureSpec, optical ? -oHeight : oHeight);
        }

        // Suppress sign extension for the low bytes
        long key = (long) widthMeasureSpec << 32 | (long) heightMeasureSpec & 0xffffffffL;
        if (mMeasureCache == null) mMeasureCache = new LongSparseLongArray(2);

        final boolean forceLayout = (mPrivateFlags & PFLAG_FORCE_LAYOUT) == PFLAG_FORCE_LAYOUT;

        // Optimize layout by avoiding an extra EXACTLY pass when the view is
        // already measured as the correct size. In API 23 and below, this
        // extra pass is required to make LinearLayout re-distribute weight.
        final boolean specChanged = widthMeasureSpec != mOldWidthMeasureSpec
                || heightMeasureSpec != mOldHeightMeasureSpec;
        final boolean isSpecExactly = MeasureSpec.getMode(widthMeasureSpec) == MeasureSpec.EXACTLY
                && MeasureSpec.getMode(heightMeasureSpec) == MeasureSpec.EXACTLY;
        final boolean matchesSpecSize = getMeasuredWidth() == MeasureSpec.getSize(widthMeasureSpec)
                && getMeasuredHeight() == MeasureSpec.getSize(heightMeasureSpec);
        final boolean needsLayout = specChanged
                && (sAlwaysRemeasureExactly || !isSpecExactly || !matchesSpecSize);

        if (forceLayout || needsLayout) {
            // first clears the measured dimension flag
            mPrivateFlags &= ~PFLAG_MEASURED_DIMENSION_SET;

            resolveRtlPropertiesIfNeeded();

            int cacheIndex = forceLayout ? -1 : mMeasureCache.indexOfKey(key);
            if (cacheIndex < 0 || sIgnoreMeasureCache) {
                // measure ourselves, this should set the measured dimension flag back
                // 这里返回了测量结果
                onMeasure(widthMeasureSpec, heightMeasureSpec);
                mPrivateFlags3 &= ~PFLAG3_MEASURE_NEEDED_BEFORE_LAYOUT;
            } else {
                long value = mMeasureCache.valueAt(cacheIndex);
                // Casting a long to int drops the high 32 bits, no mask needed
                setMeasuredDimensionRaw((int) (value >> 32), (int) value);
                mPrivateFlags3 |= PFLAG3_MEASURE_NEEDED_BEFORE_LAYOUT;
            }

            // flag not set, setMeasuredDimension() was not invoked, we raise
            // an exception to warn the developer
            if ((mPrivateFlags & PFLAG_MEASURED_DIMENSION_SET) != PFLAG_MEASURED_DIMENSION_SET) {
                throw new IllegalStateException("View with id " + getId() + ": "
                        + getClass().getName() + "#onMeasure() did not set the"
                        + " measured dimension by calling"
                        + " setMeasuredDimension()");
            }

            mPrivateFlags |= PFLAG_LAYOUT_REQUIRED;
        }

        mOldWidthMeasureSpec = widthMeasureSpec;
        mOldHeightMeasureSpec = heightMeasureSpec;

        mMeasureCache.put(key, ((long) mMeasuredWidth) << 32 |
                (long) mMeasuredHeight & 0xffffffffL); // suppress sign extension
    }
我们再来看看onMeasure(int, int):
    /**
     * 测量view自身和它的内容来确定view的width和height。该方法由 measure(int, int) 调用
     * 并且应该被子类覆写,来获取准确且高效的测量结果。
     *
     * 注意:在覆写该方法的时候,你必须调用 setMeasuredDimension(int, int) 方法来存储该 view 的 width 和 height。
     * 如果不这么干的话,将会触发 IllegalStateException 异常。直接调用父类的 onMeasure(int, int) 无效。
     *
     * 基类实现测量时,默认使用的是背景的 size,除非 MeasureSpec 提供了一个更大的 size。
     * 子类应该在覆写 onMeasure(int, int) 时提供它的内容的精确测量方法
     *
     * 如果该方法被覆写,子类应确保测量的 width 和 height 要大于 view 的最小 width 和最小 height,
     * 可以分别通过 getSuggestedMinimumWidth() 和 getSuggestedMinimumHeight() 来获取
     *
     * @param widthMeasureSpec 水平方向父类强加的Measure需求
     * @param heightMeasureSpec 垂直方向父类强加的Measure需求
     *
     */
    protected void onMeasure(int widthMeasureSpec, int heightMeasureSpec) {
        setMeasuredDimension(getDefaultSize(getSuggestedMinimumWidth(), widthMeasureSpec),
                getDefaultSize(getSuggestedMinimumHeight(), heightMeasureSpec));
    }
至此,measure过程结束。
Layout过程分析
首先要明确的是,子View的具体位置都是相对于父View而言的。
在layout过程中,子View会调用getMeasuredWidth()和getMeasuredHeight()方法获取到measure过程得到的mMeasuredWidth和mMeasuredHeight,做为自己的width和height。然后调用每一个子View的layout(l, t, r, b)函数,来确定每个子View在父View中的位置。
注意,View的onLayout方法为空实现,而ViewGroup的onLayout为abstract,因此,如果自定义的 View 要继承 ViewGroup 时,必须实现onLayout函数。
首先看看View类的layout()方法:
    /**
     * 将 size 和 position 应用到该 view 和它所有的子孙 view 中
     *
     * 这是 layout 机制的第二阶段(第一阶段当然是 measure啦)。
     * 在这个阶段里,每个父 view 会调用所有子 view 的 layout() 方法来给它们指定 position。
     * 一般情况下会使用存储在子 view 里的 measure 值来定位。
     *
     * 派生类不要覆写这个方法。
     * 有子 view 的派生类应该覆写 onLayout 方法,并且在这个方法里,调用它所有子 view 的 layout 方法。
     *
     * @param l Left position, relative to parent
     * @param t Top position, relative to parent
     * @param r Right position, relative to parent
     * @param b Bottom position, relative to parent
     */
    @SuppressWarnings({"unchecked"})
    public void layout(int l, int t, int r, int b) {
        if ((mPrivateFlags3 & PFLAG3_MEASURE_NEEDED_BEFORE_LAYOUT) != 0) {
            onMeasure(mOldWidthMeasureSpec, mOldHeightMeasureSpec);
            mPrivateFlags3 &= ~PFLAG3_MEASURE_NEEDED_BEFORE_LAYOUT;
        }

        int oldL = mLeft;
        int oldT = mTop;
        int oldB = mBottom;
        int oldR = mRight;

        boolean changed = isLayoutModeOptical(mParent) ?
                setOpticalFrame(l, t, r, b) : setFrame(l, t, r, b);

        if (changed || (mPrivateFlags & PFLAG_LAYOUT_REQUIRED) == PFLAG_LAYOUT_REQUIRED) {
            onLayout(changed, l, t, r, b);

            if (shouldDrawRoundScrollbar()) {
                if(mRoundScrollbarRenderer == null) {
                    mRoundScrollbarRenderer = new RoundScrollbarRenderer(this);
                }
            } else {
                mRoundScrollbarRenderer = null;
            }

            mPrivateFlags &= ~PFLAG_LAYOUT_REQUIRED;

            ListenerInfo li = mListenerInfo;
            if (li != null && li.mOnLayoutChangeListeners != null) {
                ArrayList<OnLayoutChangeListener> listenersCopy =
                        (ArrayList<OnLayoutChangeListener>)li.mOnLayoutChangeListeners.clone();
                int numListeners = listenersCopy.size();
                for (int i = 0; i < numListeners; ++i) {
                    listenersCopy.get(i).onLayoutChange(this, l, t, r, b, oldL, oldT, oldR, oldB);
                }
            }
        }

        final boolean wasLayoutValid = isLayoutValid();

        mPrivateFlags &= ~PFLAG_FORCE_LAYOUT;
        mPrivateFlags3 |= PFLAG3_IS_LAID_OUT;

        if (!wasLayoutValid && isFocused()) {
            mPrivateFlags &= ~PFLAG_WANTS_FOCUS;
            if (canTakeFocus()) {
                // We have a robust focus, so parents should no longer be wanting focus.
                clearParentsWantFocus();
            } else if (getViewRootImpl() == null || !getViewRootImpl().isInLayout()) {
                // This is a weird case. Most-likely the user, rather than ViewRootImpl, called
                // layout. In this case, there's no guarantee that parent layouts will be evaluated
                // and thus the safest action is to clear focus here.
                clearFocusInternal(null, /* propagate */ true, /* refocus */ false);
                clearParentsWantFocus();
            } else if (!hasParentWantsFocus()) {
                // original requestFocus was likely on this view directly, so just clear focus
                clearFocusInternal(null, /* propagate */ true, /* refocus */ false);
            }
            // otherwise, we let parents handle re-assigning focus during their layout passes.
        } else if ((mPrivateFlags & PFLAG_WANTS_FOCUS) != 0) {
            mPrivateFlags &= ~PFLAG_WANTS_FOCUS;
            View focused = findFocus();
            if (focused != null) {
                // Try to restore focus as close as possible to our starting focus.
                if (!restoreDefaultFocus() && !hasParentWantsFocus()) {
                    // Give up and clear focus once we've reached the top-most parent which wants
                    // focus.
                    focused.clearFocusInternal(null, /* propagate */ true, /* refocus */ false);
                }
            }
        }

        if ((mPrivateFlags3 & PFLAG3_NOTIFY_AUTOFILL_ENTER_ON_LAYOUT) != 0) {
            mPrivateFlags3 &= ~PFLAG3_NOTIFY_AUTOFILL_ENTER_ON_LAYOUT;
            notifyEnterOrExitForAutoFillIfNeeded(true);
        }
    }
可以看到在layout过程中调用了onLayout() 方法,派生类此时可以覆写onLayout()方法,来获取view的位置。
    /**
     * Called from layout when this view should
     * assign a size and position to each of its children.
     *
     * Derived classes with children should override
     * this method and call layout on each of
     * their children.
     * @param changed This is a new size or position for this view
     * @param left Left position, relative to parent
     * @param top Top position, relative to parent
     * @param right Right position, relative to parent
     * @param bottom Bottom position, relative to parent
     */
    protected void onLayout(boolean changed, int left, int top, int right, int bottom) {
    }
让我们举个栗子来看看LinearLayout的onLayout():
    @Override
    protected void onLayout(boolean changed, int l, int t, int r, int b) {
        if (mOrientation == VERTICAL) {
            layoutVertical(l, t, r, b);
        } else {
            layoutHorizontal(l, t, r, b);
        }
    }

    /**
     * 如果该 LinearLayout 的 orientation 被设置成 VERTICAL 的话,调用该方法来确定它的 position
     *
     * @param left
     * @param top
     * @param right
     * @param bottom
     */
    void layoutVertical(int left, int top, int right, int bottom) {
        final int paddingLeft = mPaddingLeft;

        int childTop;
        int childLeft;

        // Where right end of child should go
        final int width = right - left;
        int childRight = width - mPaddingRight;

        // Space available for child
        int childSpace = width - paddingLeft - mPaddingRight;

        final int count = getVirtualChildCount();

        final int majorGravity = mGravity & Gravity.VERTICAL_GRAVITY_MASK;
        final int minorGravity = mGravity & Gravity.RELATIVE_HORIZONTAL_GRAVITY_MASK;

        switch (majorGravity) {
           case Gravity.BOTTOM:
               // mTotalLength contains the padding already
               childTop = mPaddingTop + bottom - top - mTotalLength;
               break;

               // mTotalLength contains the padding already
           case Gravity.CENTER_VERTICAL:
               childTop = mPaddingTop + (bottom - top - mTotalLength) / 2;
               break;

           case Gravity.TOP:
           default:
               childTop = mPaddingTop;
               break;
        }

        for (int i = 0; i < count; i++) {
            final View child = getVirtualChildAt(i);
            if (child == null) {
                childTop += measureNullChild(i);
            } else if (child.getVisibility() != GONE) {
                final int childWidth = child.getMeasuredWidth();
                final int childHeight = child.getMeasuredHeight();

                final LinearLayout.LayoutParams lp =
                        (LinearLayout.LayoutParams) child.getLayoutParams();

                int gravity = lp.gravity;
                if (gravity < 0) {
                    gravity = minorGravity;
                }
                final int layoutDirection = getLayoutDirection();
                final int absoluteGravity = Gravity.getAbsoluteGravity(gravity, layoutDirection);
                switch (absoluteGravity & Gravity.HORIZONTAL_GRAVITY_MASK) {
                    case Gravity.CENTER_HORIZONTAL:
                        childLeft = paddingLeft + ((childSpace - childWidth) / 2)
                                + lp.leftMargin - lp.rightMargin;
                        break;

                    case Gravity.RIGHT:
                        childLeft = childRight - childWidth - lp.rightMargin;
                        break;

                    case Gravity.LEFT:
                    default:
                        childLeft = paddingLeft + lp.leftMargin;
                        break;
                }

                if (hasDividerBeforeChildAt(i)) {
                    childTop += mDividerHeight;
                }

                childTop += lp.topMargin;
                setChildFrame(child, childLeft, childTop + getLocationOffset(child),
                        childWidth, childHeight);
                childTop += childHeight + lp.bottomMargin + getNextLocationOffset(child);

                i += getChildrenSkipCount(child, i);
            }
        }
    }

    /**
     * 如果该 LinearLayout 的 orientation 被设置成 HORIZONTAL 的话,调用该方法来确定它的 position
     *
     * @param left
     * @param top
     * @param right
     * @param bottom
     */
    void layoutHorizontal(int left, int top, int right, int bottom) {
        final boolean isLayoutRtl = isLayoutRtl();
        final int paddingTop = mPaddingTop;

        int childTop;
        int childLeft;

        // Where bottom of child should go
        final int height = bottom - top;
        int childBottom = height - mPaddingBottom;

        // Space available for child
        int childSpace = height - paddingTop - mPaddingBottom;

        final int count = getVirtualChildCount();

        final int majorGravity = mGravity & Gravity.RELATIVE_HORIZONTAL_GRAVITY_MASK;
        final int minorGravity = mGravity & Gravity.VERTICAL_GRAVITY_MASK;

        final boolean baselineAligned = mBaselineAligned;

        final int[] maxAscent = mMaxAscent;
        final int[] maxDescent = mMaxDescent;

        final int layoutDirection = getLayoutDirection();
        switch (Gravity.getAbsoluteGravity(majorGravity, layoutDirection)) {
            case Gravity.RIGHT:
                // mTotalLength contains the padding already
                childLeft = mPaddingLeft + right - left - mTotalLength;
                break;

            case Gravity.CENTER_HORIZONTAL:
                // mTotalLength contains the padding already
                childLeft = mPaddingLeft + (right - left - mTotalLength) / 2;
                break;

            case Gravity.LEFT:
            default:
                childLeft = mPaddingLeft;
                break;
        }

        int start = 0;
        int dir = 1;
        //In case of RTL, start drawing from the last child.
        if (isLayoutRtl) {
            start = count - 1;
            dir = -1;
        }

        for (int i = 0; i < count; i++) {
            final int childIndex = start + dir * i;
            final View child = getVirtualChildAt(childIndex);
            if (child == null) {
                childLeft += measureNullChild(childIndex);
            } else if (child.getVisibility() != GONE) {
                final int childWidth = child.getMeasuredWidth();
                final int childHeight = child.getMeasuredHeight();
                int childBaseline = -1;

                final LinearLayout.LayoutParams lp =
                        (LinearLayout.LayoutParams) child.getLayoutParams();

                if (baselineAligned && lp.height != LayoutParams.MATCH_PARENT) {
                    childBaseline = child.getBaseline();
                }

                int gravity = lp.gravity;
                if (gravity < 0) {
                    gravity = minorGravity;
                }

                switch (gravity & Gravity.VERTICAL_GRAVITY_MASK) {
                    case Gravity.TOP:
                        childTop = paddingTop + lp.topMargin;
                        if (childBaseline != -1) {
                            childTop += maxAscent[INDEX_TOP] - childBaseline;
                        }
                        break;

                    case Gravity.CENTER_VERTICAL:
                        // Removed support for baseline alignment when layout_gravity or
                        // gravity == center_vertical. See bug #1038483.
                        // Keep the code around if we need to re-enable this feature
                        // if (childBaseline != -1) {
                        //     // Align baselines vertically only if the child is smaller than us
                        //     if (childSpace - childHeight > 0) {
                        //         childTop = paddingTop + (childSpace / 2) - childBaseline;
                        //     } else {
                        //         childTop = paddingTop + (childSpace - childHeight) / 2;
                        //     }
                        // } else {
                        childTop = paddingTop + ((childSpace - childHeight) / 2)
                                + lp.topMargin - lp.bottomMargin;
                        break;

                    case Gravity.BOTTOM:
                        childTop = childBottom - childHeight - lp.bottomMargin;
                        if (childBaseline != -1) {
                            int descent = child.getMeasuredHeight() - childBaseline;
                            childTop -= (maxDescent[INDEX_BOTTOM] - descent);
                        }
                        break;
                    default:
                        childTop = paddingTop;
                        break;
                }

                if (hasDividerBeforeChildAt(childIndex)) {
                    childLeft += mDividerWidth;
                }

                childLeft += lp.leftMargin;
                setChildFrame(child, childLeft + getLocationOffset(child), childTop,
                        childWidth, childHeight);
                childLeft += childWidth + lp.rightMargin +
                        getNextLocationOffset(child);

                i += getChildrenSkipCount(child, childIndex);
            }
        }
    }
可以看出,VERTICAL方向的LinearLayout和HORIZONTAL方向的LinearLayout,在定位过程中,区别并不大。唯一不太相同的地方,就是HORIZONTAL的LinearLayout需要判断是否为RTL(Right-to-Left)布局。
Draw过程分析
Draw过程最重要的三个方法:
View.dispatchDraw(Canvas):
该方法发起对子视图的绘制。View中默认是空实现,ViewGroup覆写了dispatchDraw()来对其子视图进行绘制。该方法我们不用去管,自定义的ViewGroup不应该对dispatchDraw()进行复写。View.draw(Canvas):
由于ViewGroup并没有覆写此方法,因此,所有的视图最终都是调用View的draw方法进行绘制的。在自定义的视图中,也不应该覆写该方法,而是覆写onDraw(Canvas)方法进行绘制,如果自定义的视图确实要覆写该方法,那么请先调用super.draw(canvas)完成系统的绘制,然后再进行自定义的绘制。View.onDraw(Canvas):View.onDraw(Canvas)默认是空实现,自定义绘制过程需要覆写的方法,用来绘制自身的内容。
来看看源码吧:
先来看ViewGroup.dispatchDraw(Canvas)方法。该方法由系统调用,我们不需要主动调用:
    @Override
    protected void dispatchDraw(Canvas canvas) {
        boolean usingRenderNodeProperties = canvas.isRecordingFor(mRenderNode);
        final int childrenCount = mChildrenCount;
        final View[] children = mChildren;
        int flags = mGroupFlags;

        if ((flags & FLAG_RUN_ANIMATION) != 0 && canAnimate()) {
            final boolean buildCache = !isHardwareAccelerated();
            for (int i = 0; i < childrenCount; i++) {
                final View child = children[i];
                if ((child.mViewFlags & VISIBILITY_MASK) == VISIBLE) {
                    final LayoutParams params = child.getLayoutParams();
                    attachLayoutAnimationParameters(child, params, i, childrenCount);
                    bindLayoutAnimation(child);
                }
            }

            final LayoutAnimationController controller = mLayoutAnimationController;
            if (controller.willOverlap()) {
                mGroupFlags |= FLAG_OPTIMIZE_INVALIDATE;
            }

            controller.start();

            mGroupFlags &= ~FLAG_RUN_ANIMATION;
            mGroupFlags &= ~FLAG_ANIMATION_DONE;

            if (mAnimationListener != null) {
                mAnimationListener.onAnimationStart(controller.getAnimation());
            }
        }

        int clipSaveCount = 0;
        final boolean clipToPadding = (flags & CLIP_TO_PADDING_MASK) == CLIP_TO_PADDING_MASK;
        if (clipToPadding) {
            clipSaveCount = canvas.save(Canvas.CLIP_SAVE_FLAG);
            canvas.clipRect(mScrollX + mPaddingLeft, mScrollY + mPaddingTop,
                    mScrollX + mRight - mLeft - mPaddingRight,
                    mScrollY + mBottom - mTop - mPaddingBottom);
        }

        // We will draw our child's animation, let's reset the flag
        mPrivateFlags &= ~PFLAG_DRAW_ANIMATION;
        mGroupFlags &= ~FLAG_INVALIDATE_REQUIRED;

        boolean more = false;
        final long drawingTime = getDrawingTime();

        if (usingRenderNodeProperties) canvas.insertReorderBarrier();
        final int transientCount = mTransientIndices == null ? 0 : mTransientIndices.size();
        int transientIndex = transientCount != 0 ? 0 : -1;
        // Only use the preordered list if not HW accelerated, since the HW pipeline will do the
        // draw reordering internally
        final ArrayList<View> preorderedList = usingRenderNodeProperties
                ? null : buildOrderedChildList();
        final boolean customOrder = preorderedList == null
                && isChildrenDrawingOrderEnabled();

        // 开始绘制 child
        for (int i = 0; i < childrenCount; i++) {
            while (transientIndex >= 0 && mTransientIndices.get(transientIndex) == i) {
                final View transientChild = mTransientViews.get(transientIndex);
                if ((transientChild.mViewFlags & VISIBILITY_MASK) == VISIBLE ||
                        transientChild.getAnimation() != null) {
                    more |= drawChild(canvas, transientChild, drawingTime);
                }
                transientIndex++;
                if (transientIndex >= transientCount) {
                    transientIndex = -1;
                }
            }

            final int childIndex = getAndVerifyPreorderedIndex(childrenCount, i, customOrder);
            final View child = getAndVerifyPreorderedView(preorderedList, children, childIndex);
            if ((child.mViewFlags & VISIBILITY_MASK) == VISIBLE || child.getAnimation() != null) {
                more |= drawChild(canvas, child, drawingTime);
            }
        }
        while (transientIndex >= 0) {
            // there may be additional transient views after the normal views
            final View transientChild = mTransientViews.get(transientIndex);
            if ((transientChild.mViewFlags & VISIBILITY_MASK) == VISIBLE ||
                    transientChild.getAnimation() != null) {
                more |= drawChild(canvas, transientChild, drawingTime);
            }
            transientIndex++;
            if (transientIndex >= transientCount) {
                break;
            }
        }
        if (preorderedList != null) preorderedList.clear();

        // Draw any disappearing views that have animations
        if (mDisappearingChildren != null) {
            final ArrayList<View> disappearingChildren = mDisappearingChildren;
            final int disappearingCount = disappearingChildren.size() - 1;
            // Go backwards -- we may delete as animations finish
            for (int i = disappearingCount; i >= 0; i--) {
                final View child = disappearingChildren.get(i);
                more |= drawChild(canvas, child, drawingTime);
            }
        }
        if (usingRenderNodeProperties) canvas.insertInorderBarrier();

        if (debugDraw()) {
            onDebugDraw(canvas);
        }

        if (clipToPadding) {
            canvas.restoreToCount(clipSaveCount);
        }

        // mGroupFlags might have been updated by drawChild()
        flags = mGroupFlags;

        if ((flags & FLAG_INVALIDATE_REQUIRED) == FLAG_INVALIDATE_REQUIRED) {
            invalidate(true);
        }

        if ((flags & FLAG_ANIMATION_DONE) == 0 && (flags & FLAG_NOTIFY_ANIMATION_LISTENER) == 0 &&
                mLayoutAnimationController.isDone() && !more) {
            // We want to erase the drawing cache and notify the listener after the
            // next frame is drawn because one extra invalidate() is caused by
            // drawChild() after the animation is over
            mGroupFlags |= FLAG_NOTIFY_ANIMATION_LISTENER;
            final Runnable end = new Runnable() {
               @Override
               public void run() {
                   notifyAnimationListener();
               }
            };
            post(end);
        }
    }
可以看到,dispatchDraw(Canvas)方法主要有处理动画相关的事务、绘制child、绘制消失的child。
在绘制child时,调用的drawChild()如下:
    /**
     * 绘制该 ViewGroup 其中一个 child。该方法的主要职责是将 canvas 置为合适的状态(包括 clipping、translating等),
     * 让 child 的初始滚动位置置为 0,0,并应用动画效果。
     *
     * @param canvas The canvas on which to draw the child
     * @param child Who to draw
     * @param drawingTime The time at which draw is occurring
     * @return True if an invalidate() was issued
     */
    protected boolean drawChild(Canvas canvas, View child, long drawingTime) {
        return child.draw(canvas, this, drawingTime);
    }
接着就是View.draw(Canvas)部分:
    /**
     * 使用给定的 canvas 手动渲染这个 view(和它的子 view 们)。
     * 该 view 必须已经完成了 layout 过程,才能调用该方法。
     * 当实现自定义 view 时,覆写onDraw(Canvas)方法,而不是覆写draw(Canvas)方法。如果真的要覆写,那先调用一个super.draw(canvas)
     *
     * @param canvas The Canvas to which the View is rendered.
     */
    @CallSuper
    public void draw(Canvas canvas) {
        final int privateFlags = mPrivateFlags;
        mPrivateFlags = (privateFlags & ~PFLAG_DIRTY_MASK) | PFLAG_DRAWN;

        /*
         * 遍历绘制需要按照下面的步骤来:
         *
         *      1. 绘制背景
         *      2. 如果需要绘制边缘渐隐,则需要保存 canvas 的图层
         *      3. 绘制 view 的内容
         *      4. 绘制 child
         *      5. 如果需要,绘制边缘渐隐并恢复图层
         *      6. 绘制其他装饰(比如 scrollbar)
         */

        // 第1步,绘制背景
        int saveCount;

        drawBackground(canvas);

        // 如果可能的话,跳过第2步和第5步。
        final int viewFlags = mViewFlags;
        boolean horizontalEdges = (viewFlags & FADING_EDGE_HORIZONTAL) != 0;
        boolean verticalEdges = (viewFlags & FADING_EDGE_VERTICAL) != 0;
        if (!verticalEdges && !horizontalEdges) {
            // 第3步,绘制内容
            onDraw(canvas);

            // 第4步,绘制子child
            dispatchDraw(canvas);

            drawAutofilledHighlight(canvas);

            // Overlay 也是内容的一部分,绘制在前景的下层
            if (mOverlay != null && !mOverlay.isEmpty()) {
                mOverlay.getOverlayView().dispatchDraw(canvas);
            }

            // 第6步,绘制其他装饰(前景色啊 scrollbar 啊)
            onDrawForeground(canvas);

            // 第7步,绘制默认的焦点高亮
            drawDefaultFocusHighlight(canvas);

            if (debugDraw()) {
                debugDrawFocus(canvas);
            }

            // 完事儿走人
            return;
        }

        /*
         * 这儿实现了一个完整的流程,这个流程并不常见,因为它会对速度有一定的影响。
         */

        boolean drawTop = false;
        boolean drawBottom = false;
        boolean drawLeft = false;
        boolean drawRight = false;

        float topFadeStrength = 0.0f;
        float bottomFadeStrength = 0.0f;
        float leftFadeStrength = 0.0f;
        float rightFadeStrength = 0.0f;

        // 第2步,保存 canvas 的图层
        int paddingLeft = mPaddingLeft;

        final boolean offsetRequired = isPaddingOffsetRequired();
        if (offsetRequired) {
            paddingLeft += getLeftPaddingOffset();
        }

        int left = mScrollX + paddingLeft;
        int right = left + mRight - mLeft - mPaddingRight - paddingLeft;
        int top = mScrollY + getFadeTop(offsetRequired);
        int bottom = top + getFadeHeight(offsetRequired);

        if (offsetRequired) {
            right += getRightPaddingOffset();
            bottom += getBottomPaddingOffset();
        }

        final ScrollabilityCache scrollabilityCache = mScrollCache;
        final float fadeHeight = scrollabilityCache.fadingEdgeLength;
        int length = (int) fadeHeight;

        // clip the fade length if top and bottom fades overlap
        // overlapping fades produce odd-looking artifacts
        if (verticalEdges && (top + length > bottom - length)) {
            length = (bottom - top) / 2;
        }

        // also clip horizontal fades if necessary
        if (horizontalEdges && (left + length > right - length)) {
            length = (right - left) / 2;
        }

        if (verticalEdges) {
            topFadeStrength = Math.max(0.0f, Math.min(1.0f, getTopFadingEdgeStrength()));
            drawTop = topFadeStrength * fadeHeight > 1.0f;
            bottomFadeStrength = Math.max(0.0f, Math.min(1.0f, getBottomFadingEdgeStrength()));
            drawBottom = bottomFadeStrength * fadeHeight > 1.0f;
        }

        if (horizontalEdges) {
            leftFadeStrength = Math.max(0.0f, Math.min(1.0f, getLeftFadingEdgeStrength()));
            drawLeft = leftFadeStrength * fadeHeight > 1.0f;
            rightFadeStrength = Math.max(0.0f, Math.min(1.0f, getRightFadingEdgeStrength()));
            drawRight = rightFadeStrength * fadeHeight > 1.0f;
        }

        saveCount = canvas.getSaveCount();
        int topSaveCount = -1;
        int bottomSaveCount = -1;
        int leftSaveCount = -1;
        int rightSaveCount = -1;

        int solidColor = getSolidColor();
        if (solidColor == 0) {
            if (drawTop) {
                topSaveCount = canvas.saveUnclippedLayer(left, top, right, top + length);
            }

            if (drawBottom) {
                bottomSaveCount = canvas.saveUnclippedLayer(left, bottom - length, right, bottom);
            }

            if (drawLeft) {
                leftSaveCount = canvas.saveUnclippedLayer(left, top, left + length, bottom);
            }

            if (drawRight) {
                rightSaveCount = canvas.saveUnclippedLayer(right - length, top, right, bottom);
            }
        } else {
            scrollabilityCache.setFadeColor(solidColor);
        }

        // 第3步,绘制内容
        onDraw(canvas);

        // 第4步,绘制child
        dispatchDraw(canvas);

        // 第5步,绘制渐隐边缘并恢复图层
        final Paint p = scrollabilityCache.paint;
        final Matrix matrix = scrollabilityCache.matrix;
        final Shader fade = scrollabilityCache.shader;

        // 还得按照保存的顺序反向恢复
        if (drawRight) {
            matrix.setScale(1, fadeHeight * rightFadeStrength);
            matrix.postRotate(90);
            matrix.postTranslate(right, top);
            fade.setLocalMatrix(matrix);
            p.setShader(fade);
            if (solidColor == 0) {
                canvas.restoreUnclippedLayer(rightSaveCount, p);

            } else {
                canvas.drawRect(right - length, top, right, bottom, p);
            }
        }

        if (drawLeft) {
            matrix.setScale(1, fadeHeight * leftFadeStrength);
            matrix.postRotate(-90);
            matrix.postTranslate(left, top);
            fade.setLocalMatrix(matrix);
            p.setShader(fade);
            if (solidColor == 0) {
                canvas.restoreUnclippedLayer(leftSaveCount, p);
            } else {
                canvas.drawRect(left, top, left + length, bottom, p);
            }
        }

        if (drawBottom) {
            matrix.setScale(1, fadeHeight * bottomFadeStrength);
            matrix.postRotate(180);
            matrix.postTranslate(left, bottom);
            fade.setLocalMatrix(matrix);
            p.setShader(fade);
            if (solidColor == 0) {
                canvas.restoreUnclippedLayer(bottomSaveCount, p);
            } else {
                canvas.drawRect(left, bottom - length, right, bottom, p);
            }
        }

        if (drawTop) {
            matrix.setScale(1, fadeHeight * topFadeStrength);
            matrix.postTranslate(left, top);
            fade.setLocalMatrix(matrix);
            p.setShader(fade);
            if (solidColor == 0) {
                canvas.restoreUnclippedLayer(topSaveCount, p);
            } else {
                canvas.drawRect(left, top, right, top + length, p);
            }
        }

        canvas.restoreToCount(saveCount);

        drawAutofilledHighlight(canvas);

        // Overlay 也是内容的一部分,绘制在前景的下层
        if (mOverlay != null && !mOverlay.isEmpty()) {
            mOverlay.getOverlayView().dispatchDraw(canvas);
        }

        // 第6步,绘制其他装饰(前景色啊 scrollbar 啊)
        onDrawForeground(canvas);

        if (debugDraw()) {
            debugDrawFocus(canvas);
        }
    }
由代码可以看出,第2步和第5步是可以省略不做的,并且可以极大地提高性能。所以通常情况下,不要设置FadingEdge。
::: tip
FadingEdge是个啥?
就是边缘渐隐,通常长这个样子:
根据官方文档来看,android:fadingEdge已经被弃用了。如果想实现这种效果,要这样设置:
android:requiresFadingEdge="horizontal"
android:fadingEdgeLength="40dp"
android:ellipsize="none"
同时,尽量将layout_width设置为match_parent或者100dp之类的。
:::
同样地,我们还是拿LinearLayout来举例,看看它的onDraw(Canvas)是如何实现的:
    @Override
    protected void onDraw(Canvas canvas) {
        if (mDivider == null) {
            return;
        }

        if (mOrientation == VERTICAL) {
            drawDividersVertical(canvas);
        } else {
            drawDividersHorizontal(canvas);
        }
    }

    void drawDividersVertical(Canvas canvas) {
        final int count = getVirtualChildCount();
        for (int i = 0; i < count; i++) {
            final View child = getVirtualChildAt(i);
            if (child != null && child.getVisibility() != GONE) {
                if (hasDividerBeforeChildAt(i)) {
                    final LayoutParams lp = (LayoutParams) child.getLayoutParams();
                    final int top = child.getTop() - lp.topMargin - mDividerHeight;
                    drawHorizontalDivider(canvas, top);
                }
            }
        }

        if (hasDividerBeforeChildAt(count)) {
            final View child = getLastNonGoneChild();
            int bottom = 0;
            if (child == null) {
                bottom = getHeight() - getPaddingBottom() - mDividerHeight;
            } else {
                final LayoutParams lp = (LayoutParams) child.getLayoutParams();
                bottom = child.getBottom() + lp.bottomMargin;
            }
            drawHorizontalDivider(canvas, bottom);
        }
    }

    void drawDividersHorizontal(Canvas canvas) {
        final int count = getVirtualChildCount();
        final boolean isLayoutRtl = isLayoutRtl();
        for (int i = 0; i < count; i++) {
            final View child = getVirtualChildAt(i);
            if (child != null && child.getVisibility() != GONE) {
                if (hasDividerBeforeChildAt(i)) {
                    final LayoutParams lp = (LayoutParams) child.getLayoutParams();
                    final int position;
                    if (isLayoutRtl) {
                        position = child.getRight() + lp.rightMargin;
                    } else {
                        position = child.getLeft() - lp.leftMargin - mDividerWidth;
                    }
                    drawVerticalDivider(canvas, position);
                }
            }
        }

        if (hasDividerBeforeChildAt(count)) {
            final View child = getLastNonGoneChild();
            int position;
            if (child == null) {
                if (isLayoutRtl) {
                    position = getPaddingLeft();
                } else {
                    position = getWidth() - getPaddingRight() - mDividerWidth;
                }
            } else {
                final LayoutParams lp = (LayoutParams) child.getLayoutParams();
                if (isLayoutRtl) {
                    position = child.getLeft() - lp.leftMargin - mDividerWidth;
                } else {
                    position = child.getRight() + lp.rightMargin;
                }
            }
            drawVerticalDivider(canvas, position);
        }
    }
可以看到,在LinearLayout的onDraw(Canvas)方法中,只是多绘制了一个divider,如果没有divider的话,那就不再处理。
其他的重要方法
invalidate()方法:
该方法请求重绘View树,即draw过程,假如视图发生大小没有变化就不会调用layout过程,并且只绘制那些『需要重绘的』
视图,即谁请求invalidate()方法,就绘制谁(View的话,只绘制该View;ViewGroup,则绘制整个ViewGroup)。
一般引起invalidate()操作的函数如下:
直接调用
invalidate()方法,请求重新draw(),但只会绘制调用者本身。setSelection()方法 :请求重新draw(),但只会绘制调用者本身。setVisibility()方法 : 当View可视状态在INVISIBLE转换VISIBLE时,会间接调用invalidate()方法,
继而绘制该View。setEnabled()方法 : 请求重新draw(),但不会重新绘制任何视图包括该调用者本身。
requestLayout()方法:
看字面意思『请求布局』。调用该方法会导致调用measure过程和layout过程,但只是对View树重新布局,不会调用draw过程,也就是不会重新绘制。
看一眼它的源码吧:
    /**
     * 当某些东西发生了改变并刷新了 View 布局时,调用该方法。
     * 该方法会对 View 树进行一次 layout 流程。
     * 该方法不应该在 view 树正在进行 layout 流程(可由 isInLayout()方法判断)时被调用。
     * 如果调用该方法时正在进行 layout 流程,这次的请求会被放在当前 layout 流程结束之后(也就是再跑一次),或者是
     * 绘制完当前帧之后。
     *
     * 子类覆写该方法时,要调用 super.requestLayout() 以保证能正确处理一些 request-during-layout 的错误。
     */
    @CallSuper
    public void requestLayout() {
        if (mMeasureCache != null) mMeasureCache.clear();

        if (mAttachInfo != null && mAttachInfo.mViewRequestingLayout == null) {
            // Only trigger request-during-layout logic if this is the view requesting it,
            // not the views in its parent hierarchy
            ViewRootImpl viewRoot = getViewRootImpl();
            if (viewRoot != null && viewRoot.isInLayout()) {
                if (!viewRoot.requestLayoutDuringLayout(this)) {
                    return;
                }
            }
            mAttachInfo.mViewRequestingLayout = this;
        }

        mPrivateFlags |= PFLAG_FORCE_LAYOUT;
        mPrivateFlags |= PFLAG_INVALIDATED;

        if (mParent != null && !mParent.isLayoutRequested()) {
            mParent.requestLayout();
        }
        if (mAttachInfo != null && mAttachInfo.mViewRequestingLayout == this) {
            mAttachInfo.mViewRequestingLayout = null;
        }
    }
可以看到,requestLayout()方法会不断向上传,向父view请求布局,最后会交给DecorView,也即根view,最终会被ViewRootImpl接收并得到处理。关于ViewRootImpl,会单开一篇文章再来讲,里面会涉及到Activity、Window、WindowManager等内容。