在 Android 系统中,四大组件中,Service 的重要性也是不言而喻的,它可以长时间在后台生存,执行一些复杂的或者耗时的工作。即便用户切换到了其他应用,Service 仍将在后台继续运行。此外,组件可通过绑定到 Service 与之进行交互,甚至是执行进程间通信 (IPC)。
Service 的分类
我们一般将 Service 分为三大类:后台 Service 、绑定 Service 和前台 Service 。其中,后台 Service 和绑定 Service 是『不可见 Service』,前台 Service 是『可见 Service』。
后台 Service
后台 Service (Background Service)一般是用来执行一些用户不会直接注意到的操作,比如解压数据包,比如进行网络请求。
需要注意的是,API 26(Android 8.0)之后,如果应用本身没有在前台运行,系统会对后台可执行的操作增加一些限制。这些限制有两个方面:
后台 Service 限制。这些限制不适用于前台 Service,因为前台 Service 更容易引起用户注意。
在后台运行的 Service 会消耗资源,这有可能会造成不良的用户体验,所以 Android 对应用状态进行了区分:前台应用和后台应用。满足下面任意条件,即可视为前台应用:
- 具有可见的 Activity
- 具有前台 Service
- 另一个前台应用已关联到该应用,比如说输入法在应用中弹出,应用正在与屏幕识别和读取功能交互等等。
如果上面的条件都不满足,应用就会被视为后台应用。
当应用处于前台时,可以随意创建和运行前台、后台 Service。当进入后台时,会有几分钟的时间,应用仍然可以创建和使用 Service,这个时间一过,应用就会被视为处于空闲状态,这时,系统将停止应用的后台 Service。
但是,大多数情况下,可以使用 JobScheduler 来完成 Service 能完成的操作。对于 JobScheduler 的解析,在
这篇文章里。广播限制。除了一些特殊的例外情况,应用无法使用 AndroidManifest 注册隐式广播。但是仍然可以在运行时注册广播,并且可以使用 AndroidManifest 注册专门针对它们的显式广播。具体的限制如下:
- 应用不能在 AndroidManifest 中为隐式广播注册广播接收器。例如
ACTION_PACKAGE_REPLACED广播。显式广播不受影响。 - 应用可以使用
Context.registerReceiver()为任意广播(不管是显式还是隐式)注册接收器。 - 需要签名权限的广播不受此限制所限,因为这些广播只会发送到使用相同证书签名的应用,而不是发送到设备上的所有应用。
同样地,之前使用隐式广播的应用也可以使用 JobScheduler + 动态注册广播接收器来实现类似的功能。
- 应用不能在 AndroidManifest 中为隐式广播注册广播接收器。例如
绑定 Service
当系统组件与 Service 进行绑定时, Service 就处于『绑定状态』。绑定 Service 会以 C/S 模式提供接口,以便组件与 Service 进行交互、发送请求、接收结果,甚至是跨进程通信(IPC)来执行这些操作。绑定 Service 只会在与某个系统组件绑定时才会运行。多个组件可同时绑定到该 Service ,全部取消绑定后,该 Service 才会被销毁。
但是,绑定 Service 并不是说不能以正常的方式来运行,一个 Service ,它既可以是启动 Service (以无限期运行),也同时支持绑定,看你要覆写哪种方法了:onStartCommand()是让组件来启动 Service 后会回调的方法,而onBind()是以绑定方式启动 Service 后回调的方法。但无论是哪种 Service ,都可以使用 Intent 来启动它。
前台 Service
前台 Service (Foreground Service)可以被用户看到。通常前台 Service 必须在通知栏显示一个通知,比如各种音乐 APP:

即使用户停止与 App 的交互, Service 也依然会继续运行。
为什么要使用 Service
如上所述,使用 Service 有诸多限制,而且还分什么前台后台绑定,用子线程它不香吗?
这里要看使用场景。
Service 是一种即便用户不与它交互,也能一直运行在后台的组件,它默认是运行在主线程上的。因此,Service 适合执行短期的、不阻塞的、不与用户交互的任务。如果你必须要在主线程之外执行一些操作,比如密集性的网络通信、比如进行大量数据的初始化和解析,那你最好还是选择在 Service 中新建一个线程来做这件事。
Service 的食用指南
覆写方法
使用 Service 的时候,我们必须要自定义一个继承 Service 的类,并覆写下面几种重要的方法:
onStartCommand(Intent intent, int flags, int startId):当另一个组件(如 Activity)请求启动 Service 时,一般会通过调用
startService()来启动,此时,系统会执行onStartCommand()方法(具体如何调用的,查看这一章节),如果此时有 Intent 传入,则可以进行一些初始化的工作。通常情况下,这个方法被调用的时候, Service 已经启动了。如果是要覆写该方法的话,那你得使用stopSelf()或stopService()来停止 Service 。如果只想提供一个绑定 Service ,则无需覆写此方法。你可能会注意到,在覆写时,还有个
onStart()方法,如果查看源码的话,在onStartCommand()中直接调用了onStart()。该方法在 Android 4.0.3之后就被废弃了,现在都采用直接覆写onStartCommand()方法了。
它的第一个参数是一个 Intent,是启动 Service 时组件传递过来的 Intent,可以用于初始化。这个 Intent 有可能为 null,哪怕你明明传递了非 null 的 Intent。具体原因在下面会讲到。
它的第二个参数是一个 int 值,是启动 Service 时系统给的额外参数,一般情况下是0,也有可能是START_FLAT_REDELIVERY(Intent 之前传递过)和START_FLAG_RETRY(之前的 Intent 没有正确传递过来,重试传递)的或值。
它的第三个参数也是一个 int 值,叫startId,它用来唯一标识一次启动请求,会在stopSelfResult(int)这个方法中用到这个值,用以终止当前 Service。它和stopService()是有区别的,stopService()方法一旦被调用,就直接一刀砍死 Service,毫不留情;但stopSelfResult()会检查startId,如果在调用stopSelfResult()的时候又来了个启动的请求,此时startId发生了变化,它就会大喊一声『刀下留人~~~~』,Service 就不会死掉了。
它的返回值也是一个 int 值,有下面几种选择:
START_STICKY:被系统清理后,会保留 Service 的启动状态,但不保留 Intent,系统重启 Service 后会重新调用onStartCommand()方法,但如果这期间没有收到任何 Intent,那传入的 Intent 就是 null,需要小心处理。START_STICKY_COMPATIBILITY:START_STICKY的兼容版本,但是不能保证onStartCommand()会被调用。START_NOT_STICKY:被系统清理后,不保留 Service 状态。START_REDELIVER_INTENT:被系统清理后,会保留 Service 状态,同时会保留 Intent,系统重启 Service 后会重新调用onStartCommand()方法,此时会传入之前保留的 Intent。
默认情况下,onStartCommand()会返回START_STICKY_COMPATIBILITY或者START_STICKY。
onBind(Intent intent):当以绑定方式启动 Service 时,系统会调用这个方法(具体如何调用的,查看这一章节),如果此时有 Intent 传入,则可以进行一些初始化的工作。如果要实现与 Client 端通信,那么这个方法必须要返回一个 IBinder 的接口;如果该 Service 不希望与 Client 端通信,可以直接返回 null。
onCreate():这一看就是生命周期回调方法。这个方法会在
onStartCommand()和onBind()之前被调用。如果 Service 已经在运行了,而再次尝试启动 Service 的话,这个方法不会再被调用。onDestroy():生命周期回调方法,在 Service 被销毁之前调用。可以在这里面做一些回收线程、注销 BroadcastReceiver 之类的工作。
值得注意的是,Service 在一般情况下不会被销毁,如果这个 Service 是前台 Service ,那它几乎永远不会终止(运行在某些国产OS上除外,说砍就砍没得商量🔪);如果 Service 被绑定到前台 Activity 上,它也不太可能会终止;如果系统在低内存且必须回收资源以保证前台 Activity 与用户的交互的情况下终止了 Service ,那么在这种情况缓解时会立即重启 Service ——当然,要看
onStartCommand()中你返回了个啥。
声明 Service
如果想要该 Service 可用,必须在 AndroidManifest 中注册这个 Service ,如下:
<manifest ...>
  <application ...>
    <service android:name=".CustomService" />
  </application>
</manifest>
在<service>标签中,还有很多其他的属性可以设置,我们来介绍几个比较重要的。
android:name:这是唯一必需的属性,用于指定 Service 的类名。在维护代码的过程中,尽量保持这个类名不变,以避免一些用显式 Intent 启动 Service 的代码碰钉子。
显式 Intent
隐式 Intent 指的是不指定特定处理者的 Intent,谁都可以接收和处理;而显式 Intent 指定了接收者,除了指定的接收者外,任何应用都无法接收和使用这个 Intent,使得应用更加安全。
从 Android 5.0 开始,如果使用隐式 Intent 调用bindService(),就会抛出异常:
java.lang.IllegalArgumentException: Service Intent must be explicit
android:enabled:表示系统是否可以实例化该 Service 。默认为true,表示可以。如果设置了false,可以通过调用PackageManager.setComponentEnabledSetting()方法动态开启。android:exported:表示其他的应用能否调用该 Service 或者与之交互。该属性的默认值取决于该 Service 是否包含 Intent Filter。如果没有任何 Filter 则表示 Service 只能通过指定确切的类名来调用,也意味着该 Service 是『应用内部专享』,因为其他的应用不知道它的类名(正常情况下)。在这种情况下,默认值是false;反之如果有任意一个 Filter 则表明 Service 可以供外部使用,这时默认值是true。另外,要限制这个 Service 的暴露,将该字段设置为 false 并不是唯一的方式。还可以使用权限控制
android:permission来限制哪些外部应用可以与 Service 交互。下面会讲到。android:permission:组件启动 Service 或绑定到 Service 所必需的权限的名称。如果startService()、bindService()或stopService()的调用者尚未获得此权限,那该方法将不起作用,且系统不会将 Intent 对象传送给 Service ,也即无法完成交互。如果未设置该属性,则系统将会将其设置为<application>标签中permission属性所设置的权限(注意:不是<uses-permisson>标签)。如果两个属性都没设置,则 Service 不受权限保护。android:process:将运行 Service 的进程名称。正常情况下,应用的所有组件都会在为应用创建的默认进程中运行。该名称与应用包名相同。<application>元素的process属性可为所有组件设置默认进程名称。不过,组件可以使用自己的process属性替换默认值,从而将应用散布到多个进程中。如果为此属性分配的名称以冒号
:开头,则系统会在需要时创建应用专用的新进程,并且 Service 会在该进程中运行。如果进程名称以小写字符开头,则 Service 将在使用该名称的全局进程中运行,前提是它拥有相应的权限。如此一来,不同应用中的组件便可共享进程,从而减少资源使用。
启动 Service
启动 Service 有两种方法,上面讲过了,startService()和bindService()方法。我们还是分开来讲。
通过startService()启动的 Service
Intent intent = new Intent(this, CustomService.class);
startService(intent);
这种方式启动 Service ,系统将会调用onStartCommand()方法。这种 Service 在启动之后,其生命周期将独立于它的启动者。例如一个 Activity 通过这种方式启动了 Service ,哪怕 Activity 不可见了、甚至被销毁了, Service 也会继续运行。因此,我们应该在 Service 完成工作后,调用它的stopSelf()来停止运行,或者由其他的组件调用stopService()来停止该 Service 。
在调用该方法时,可以传递一个 Intent 对象给 Service , Service 会在onStartCommand()中接收到这个 Intent。多次通过这种方式启动,会多次调用到onStartCommand()方法。这通常被用来向 Service 传递数据。
此处必须再强调一次, Service 启动后,是工作在主线程上的。如果交给 Service 去做一些密集性的、耗时的、阻塞的任务,可能会影响 Activity 的性能。如果要使用 Service 做这些事,你可以在 Service 中新建线程来做这些事。
通过bindService()启动的 Service
ServiceConnection conn = new ServiceConnection() {
    @Override
    public void onServiceConnected(ComponentName className,
                  IBinder service) {
        LocalBinder binder = (LocalBinder) service;
        mService = binder.getService();
        mBound = true;
    }

    @Override
    public void onServiceDisconnected(ComponentName arg0) {
        mBound = false;
    }
}
Intent intent = new Intent(this, CustomService.class);
bindService(intent, conn, Context.BIND_AUTO_CREATE);
组件可以通过上述方式与 Service 进行长期绑定。这种 Service 在一般情况下,不允许组件通过调用startService()方法来启动它。它通常只在为其他应用组件提供服务时处于活动状态,并不会无限期地在后台运行。
这种启动方式多用在与 Activity 或者其他组件的交互,以及通过进程间通信(IPC)与其他应用产生交互。
一旦绑定,Service 就会启动,如果当前没有任何组件与 Service 是绑定状态,那 Service 就会被系统销毁,所以,对于这种 Service ,我们**不必调用stopSelf()或者stopService()**。
上面我们也说过,同一个 Service 可以同时被多个组件绑定。
在以这种方式绑定 Service 时,系统会调用onBind()方法,我们需要自己实现onBind()回调方法,返回一个 IBinder 对象,供 Client 来与 Service 进行交互。多次绑定同一个 Service ,并不会重复调用onBind()方法,系统会在第一次绑定时生成 IBinder 对象,并对其进行缓存,在之后的绑定中,直接返回这个对象给 Client。
ServiceConnection 会监控与 Service 的连接状态,如上面代码所示,它有两个需要覆写的方法:onServiceConnected()和onServiceDisconnected()。前者会传递一个 IBinder 对象进来,Client 这时需要强转成自己需要的 Binder 对象,并可以调用该对象的方法,完成与 Service 的通信。后者则是与 Service 主动解绑或丢失链接时的回调。
启动前台 Service
上面的两种 Service 都是『后台 Service 』,换言之,它们不会被用户可见。如果要启动用户可见的『前台 Service 』,需要调用startForegroundService()方法。
Intent intent = new Intent(this, CustomService.class);
startForegroundService(intent);
使用这种方法启动 Service ,就意味着 Service 在启动之后,就会立刻调用它的startForeground(int, Notification)方法,用于在通知栏中创建通知。
final int ONGOING_NOTIFICATION_ID = 1;  // 该值不可为0

Intent notificationIntent = new Intent(this, MainActivity.class);
PendingIntent pendingIntent =
        PendingIntent.getActivity(this, 0, notificationIntent, 0);

Notification notification =
          new Notification.Builder(this, CHANNEL_DEFAULT_IMPORTANCE)
    .setContentTitle(getText(R.string.notification_title))
    .setContentText(getText(R.string.notification_message))
    .setSmallIcon(R.drawable.icon)
    .setContentIntent(pendingIntent)
    .setTicker(getText(R.string.ticker_text))
    .build();

startForeground(ONGOING_NOTIFICATION_ID, notification);
使用前台 Service 可以变相实现『保活』,因为系统几乎不会考虑将它停止,哪怕内存空间不足。但是这并不代表我们可以滥用前台 Service ,因为每一个 Service 都会消耗系统资源。
如果要移除前台 Service,需要手动调用stopForeground(bool),参数表示是否要同时移除通知栏的通知。这个方法不会终止 Service。如果使用了stopServie()来终止 Service,那么通知栏中的通知也会随之被移除。
IntentService
IntentService 是 Service 的子类,它包含一个 HandlerThread,这意味着它并不是在主线程上工作的,可以将一些具有顺序性的、不需要同时处理的任务交给 IntentService 来处理。
要使用这个类,我们只需要实现它的onHandleIntent()方法,该方法会接收每个启动请求中的 Intent,并交给 HandlerThread 去处理。
值得注意的是,使用 IntentService 时,如果你需要重写onStartCommand()方法,在处理完自己的工作后,必须要调用return super.onStartCommand()方法来返回,以保证在onHandleIntent()中能正确接收到 Intent。
IntentService 在处理完所有请求后会停止 Service ,所以,不必调用stopSelf()方法。
IntentService 在 API 30 中被废弃了。
Service 的生命周期
盗个官网的图,美滋儿滋儿:
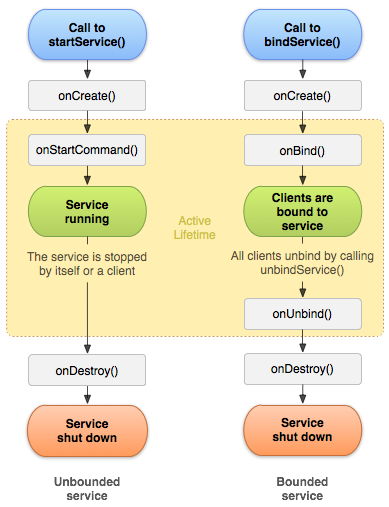
左边是使用startService()调用的生命周期,右边是bindService()
可见,Service 的生命周期很简单,与 Activity 相比简直是小巫见格格巫。下面的代码,就可以监控 Service 的所有生命周期:
public class CustomService extends Service {
    int startMode;       // indicates how to behave if the service is killed
    IBinder binder;      // interface for clients that bind
    boolean allowRebind; // indicates whether onRebind should be used

    @Override
    public void onCreate() {
        // Service 创建时回调
    }

    @Override
    public int onStartCommand(Intent intent, int flags, int startId) {
        // 服务已启动,每一次使用 startService() 启动服务时回调
        return mStartMode;
    }
    @Override
    public IBinder onBind(Intent intent) {
        // 一个 Client 正在尝试调用 bindService() 绑定该服务
        return mBinder;
    }
    @Override
    public boolean onUnbind(Intent intent) {
        // 一个 Client 正在尝试调用 unbindService() 与该服务解绑
        return mAllowRebind;
    }
    @Override
    public void onRebind(Intent intent) {
        // 一个 Client 在解绑后又尝试重新绑定
    }
    @Override
    public void onDestroy() {
        // Service 销毁之前回调
    }
}
看出来了吗?与 Activity 不一样的地方是,每一个生命周期方法,都不需要调用超类的生命周期方法。
Service详解
好,来到这篇文章最核心最复杂的部分了。我们先提出几个问题,然后带着问题去理解这部分。
Service 是如何启动的?
传递给 Service 的 Intent 是如何交到 Service 手中的?
IntentService 是如何实现的?
我们来逐个解释。
普通 Service 的启动过程
我们都知道,启动 Service 最常用的方法是Context.startService(),我们就从这儿入手,看看 Service 的启动过程是怎样的:
// android.content.Context.java

public abstract ComponentName startService(Intent service);
Service 继承自 ContextWrapper,所以
Context 是一个抽象类,它的主要实现在 ContextImpl 类里:
// android.app.ContextImpl.java

@Override
public ComponentName startService(Intent service) {
    warnIfCallingFromSystemProcess(); // 检查当前进程的 uid 是否与 Process.SYSTEM_UID 相等
    return startServiceCommon(service, false, mUser);
}

private ComponentName startServiceCommon(Intent service, boolean requireForeground,
            UserHandle user) {
        try {
            validateServiceIntent(service);
            service.prepareToLeaveProcess(this);
            ComponentName cn = ActivityManager.getService().startService(
                mMainThread.getApplicationThread(), service, service.resolveTypeIfNeeded(
                            getContentResolver()), requireForeground,
                            getOpPackageName(), user.getIdentifier());
            ...
            return cn;
        } catch (RemoteException e) {
            throw e.rethrowFromSystemServer();
        }
    }
由上面的代码可以看出,Context 将启动 Service 的任务转交给了 ActivityManager。同时交给 ActivityManager 的,还有当前 App 的主线程。这里可以解释为什么 Service 启动时会默认在主线程执行任务。
有人要杠了:这不明明是 Service 嘛,为啥交给 ActivityManager 来启动?先别杠,我们继续往下深入:
// android.app.ActivityManager.java

public static IActivityManager getService() {
    return IActivityManagerSingleton.get();
}
这里使用单例模式返回了 IActivityManager 的 Binder 对象,也即真正的startService()工作是在 ActivityManagerService 中完成的。
// com.android.server.ActivityManagerService

public class ActivityManagerService extends IActivityManager.Stub
        implements Watchdog.Monitor, BatteryStatsImpl.BatteryCallback {
    ...
    ActiveServices mServices;
    ...
    @Override
    public ComponentName startService(IApplicationThread caller, Intent service,
            String resolvedType, boolean requireForeground, String callingPackage, int userId)
            throws TransactionTooLargeException {
        ...
        // 使用 synchronized 来保证创建 Service 时的线程安全
        synchronized(this) {
            final int callingPid = Binder.getCallingPid();
            final int callingUid = Binder.getCallingUid();
            final long origId = Binder.clearCallingIdentity();
            ComponentName res;
            try {
                res = mServices.startServiceLocked(caller, service,
                        resolvedType, callingPid, callingUid,
                        requireForeground, callingPackage, userId);
            } finally {
                Binder.restoreCallingIdentity(origId);
            }
            return res;
        }
    }
    ...
}
继续看ActiveServices.startServiceLocked()方法:
// com.android.server.am.ActiveServices.java

ComponentName startServiceLocked(IApplicationThread caller, Intent service, String resolvedType,
        int callingPid, int callingUid, boolean fgRequired, String callingPackage, final int userId)
        throws TransactionTooLargeException {
    return startServiceLocked(caller, service, resolvedType, callingPid, callingUid, fgRequired,
            callingPackage, userId, false);
}

ComponentName startServiceLocked(IApplicationThread caller, Intent service, String resolvedType,
        int callingPid, int callingUid, boolean fgRequired, String callingPackage,
        final int userId, boolean allowBackgroundActivityStarts)
        throws TransactionTooLargeException {
    ...
    // 各种启动前的检查、如 App 是否存在、AndroidManifest 中是否注册、权限是否合理
    ...
    // 将 Intent 包装进了 ServiceRecord 的新实例中
    r.pendingStarts.add(new ServiceRecord.StartItem(r, false, r.makeNextStartId(),
              service, neededGrants, callingUid));
    if (fgRequired) {
        // 前台服务启动成功
        ServiceState stracker = r.getTracker();
        if (stracker != null) {
            stracker.setForeground(true, mAm.mProcessStats.getMemFactorLocked(),
                    r.lastActivity);
        }
        mAm.mAppOpsService.startOperation(AppOpsManager.getToken(mAm.mAppOpsService),
                AppOpsManager.OP_START_FOREGROUND, r.appInfo.uid, r.packageName, true);
    }
    ...
    ComponentName cmp = startServiceInnerLocked(smap, service, r, callerFg, addToStarting);
    return cmp;
}

ComponentName startServiceInnerLocked(ServiceMap smap, Intent service, ServiceRecord r,
        boolean callerFg, boolean addToStarting) throws TransactionTooLargeException {
    ...
    // 记录一次运行,方便系统计算电量与运行时间的关系
    synchronized (r.stats.getBatteryStats()) {
        r.stats.startRunningLocked();
    }
    String error = bringUpServiceLocked(r, service.getFlags(), callerFg, false, false);
    ...
    return r.name;
}

private String bringUpServiceLocked(ServiceRecord r, int intentFlags, boolean execInFg,
        boolean whileRestarting, boolean permissionsReviewRequired)
        throws TransactionTooLargeException {
    ...
    // 还是各种检查

    // Service 正在被启动,此时它不能被 force stop
    try {
        AppGlobals.getPackageManager().setPackageStoppedState(
                r.packageName, false, r.userId);
    } catch (RemoteException e) {
    } catch (IllegalArgumentException e) {
        Slog.w(TAG, "Failed trying to unstop package "
                + r.packageName + ": " + e);
    }

    ...
    ProcessRecord app;

    if (!isolated) {
        app = mAm.getProcessRecordLocked(procName, r.appInfo.uid, false);

        if (app != null && app.thread != null) {
            try {
                app.addPackage(r.appInfo.packageName, r.appInfo.longVersionCode, mAm.mProcessStats);
                // 这里开始启动服务
                realStartServiceLocked(r, app, execInFg);
                return null;
            } catch (TransactionTooLargeException e) {
                throw e;
            } catch (RemoteException e) {
                Slog.w(TAG, "Exception when starting service " + r.shortInstanceName, e);
            }

            // If a dead object exception was thrown -- fall through to
            // restart the application.
        }
    } else {
        ...
    }

    ...
    return null;
}

private final void realStartServiceLocked(ServiceRecord r,
            ProcessRecord app, boolean execInFg) throws RemoteException {
    ...
    // 好熟悉的一句话,在 AMS 中,也是使用了 ActivityThread 中的 scheduleXXX 来实现的创建 Activity 的功能
    app.thread.scheduleCreateService(r, r.serviceInfo,
            mAm.compatibilityInfoForPackage(r.serviceInfo.applicationInfo),
            app.getReportedProcState());
    ...
    // 这里开始向 Service 发送 Intent,也即调用 onStartCommand() 方法
    sendServiceArgsLocked(r, execInFg, true);
    ...
}

private final void sendServiceArgsLocked(ServiceRecord r, boolean execInFg,
            boolean oomAdjusted) throws TransactionTooLargeException {
    ...
    r.app.thread.scheduleServiceArgs(r, slice);
    ...
}
可以看到,与 AMS 创建 Activity 的过程很相似,都是通过 ActivityThread 来完成最后的创建工作,之前所有的检查工作,都是为了保证安全性,同时记录一些 Service 的启动信息,以便进行后期管理。
scheduleCreateService()和scheduleCreateArgs()分别向 ActivityThread 中的 Handler 发送了CREATE_SERVICE和SERVICE_ARGS事件,并分别调用到handleCreateService()和handleServiceArgs((ServiceArgsData)msg.obj)方法:
// android.app.ActivityThread.java

private void handleCreateService(CreateServiceData data) {
    ...
    LoadedApk packageInfo = getPackageInfoNoCheck(
            data.info.applicationInfo, data.compatInfo);
    Service service = null;
    try {
        // 利用反射创建 Service 的实例
        java.lang.ClassLoader cl = packageInfo.getClassLoader();
        service = packageInfo.getAppFactory()
                .instantiateService(cl, data.info.name, data.intent);
    } catch (Exception e) {
        if (!mInstrumentation.onException(service, e)) {
            throw new RuntimeException(
                "Unable to instantiate service " + data.info.name
                + ": " + e.toString(), e);
        }
    }

    try {
        if (localLOGV) Slog.v(TAG, "Creating service " + data.info.name);

        ContextImpl context = ContextImpl.createAppContext(this, packageInfo);
        context.setOuterContext(service);

        Application app = packageInfo.makeApplication(false, mInstrumentation);
        service.attach(context, this, data.info.name, data.token, app,
                ActivityManager.getService());

        // 调用了 Service 的 onCreate 生命周期方法
        service.onCreate();
        mServices.put(data.token, service);
        try {
            ActivityManager.getService().serviceDoneExecuting(
                    data.token, SERVICE_DONE_EXECUTING_ANON, 0, 0);
        } catch (RemoteException e) {
            throw e.rethrowFromSystemServer();
        }
    } catch (Exception e) {
        if (!mInstrumentation.onException(service, e)) {
            throw new RuntimeException(
                "Unable to create service " + data.info.name
                + ": " + e.toString(), e);
        }
    }
}

private void handleServiceArgs(ServiceArgsData data) {
    Service s = mServices.get(data.token);
    if (s != null) {
        try {
            if (data.args != null) {
                data.args.setExtrasClassLoader(s.getClassLoader());
                data.args.prepareToEnterProcess();
            }
            int res;
            if (!data.taskRemoved) {
                // 调用了 onStartCommand 生命周期方法
                res = s.onStartCommand(data.args, data.flags, data.startId);
            } else {
                s.onTaskRemoved(data.args);
                res = Service.START_TASK_REMOVED_COMPLETE;
            }

            QueuedWork.waitToFinish();

            try {
                ActivityManager.getService().serviceDoneExecuting(
                        data.token, SERVICE_DONE_EXECUTING_START, data.startId, res);
            } catch (RemoteException e) {
                throw e.rethrowFromSystemServer();
            }
        } catch (Exception e) {
            if (!mInstrumentation.onException(s, e)) {
                throw new RuntimeException(
                        "Unable to start service " + s
                        + " with " + data.args + ": " + e.toString(), e);
            }
        }
    }
}
至此,Service 完成了创建和 Intent 的传递。我们用一张时序图,来展示整个过程:
绑定 Service 的启动过程
还是从入口方法Context.bindService()开始看:
// android.app.ContextImpl.java

@Override
public boolean bindService(Intent service, ServiceConnection conn, int flags) {
    warnIfCallingFromSystemProcess(); // 检查当前进程的 uid 是不是 Process.SYSTEM_UID
    return bindServiceCommon(service, conn, flags, null, mMainThread.getHandler(), null, getUser());
}

private boolean bindServiceCommon(Intent service, ServiceConnection conn, int flags,
        String instanceName, Handler handler, Executor executor, UserHandle user) {
    ...
    int res = ActivityManager.getService().bindIsolatedService(
        mMainThread.getApplicationThread(), getActivityToken(), service,
        service.resolveTypeIfNeeded(getContentResolver()),
        sd, flags, instanceName, getOpPackageName(), user.getIdentifier());
    ...
}
与上面相同,还是来到了 ActivityManagerService 中,省略部分代码:
// com.android.server.ActivityManagerService

public class ActivityManagerService extends IActivityManager.Stub
        implements Watchdog.Monitor, BatteryStatsImpl.BatteryCallback {
    ...
    ActiveServices mServices;
    ...
    public int bindIsolatedService(IApplicationThread caller, IBinder token, Intent service,
        String resolvedType, IServiceConnection connection, int flags, String instanceName,
        String callingPackage, int userId) throws TransactionTooLargeException {
        ...
        synchronized(this) {
            return mServices.bindServiceLocked(caller, token, service,
                resolvedType, connection, flags, instanceName, callingPackage, userId);
        }
    }
    ...
}
这里与普通 Service 不同的是,它没有返回 ComponentName,而是返回了一个 int 值。
// com.android.server.am.ActiveServices.java

int bindServiceLocked(IApplicationThread caller, IBinder token, Intent service,
        String resolvedType, final IServiceConnection connection, int flags,
        String instanceName, String callingPackage, final int userId)
        throws TransactionTooLargeException {
    ...
    // 各种检查
    ...

    // 这里有个很重要的操作。
    // 如果在应用的任何组件运行之前,需要让用户检查是否可以给予权限,这时会先计划一个绑定服务,但是并不启用它,
    // 然后启动 review Activity,并给它一个 callback,用户交互完成后,再完成服务的绑定工作
    if (mAm.getPackageManagerInternalLocked().isPermissionsReviewRequired(
            s.packageName, s.userId)) {

        permissionsReviewRequired = true;

        final ServiceRecord serviceRecord = s;
        final Intent serviceIntent = service;

        RemoteCallback callback = new RemoteCallback(
                new RemoteCallback.OnResultListener() {
            @Override
            public void onResult(Bundle result) {
                synchronized(mAm) {
                    final long identity = Binder.clearCallingIdentity();
                    try {
                        if (!mPendingServices.contains(serviceRecord)) {
                            return;
                        }
                        // If there is still a pending record, then the service
                        // binding request is still valid, so hook them up. We
                        // proceed only if the caller cleared the review requirement
                        // otherwise we unbind because the user didn't approve.
                        if (!mAm.getPackageManagerInternalLocked()
                                .isPermissionsReviewRequired(
                                        serviceRecord.packageName,
                                        serviceRecord.userId)) {
                            try {
                                // 用户通过了权限验证,则创建 Service 实例
                                bringUpServiceLocked(serviceRecord,
                                        serviceIntent.getFlags(),
                                        callerFg, false, false);
                            } catch (RemoteException e) {
                                /* ignore - local call */
                            }
                        } else {
                            unbindServiceLocked(connection);
                        }
                    } finally {
                        Binder.restoreCallingIdentity(identity);
                    }
                }
            }
        });

        final Intent intent = new Intent(Intent.ACTION_REVIEW_PERMISSIONS);
        intent.addFlags(Intent.FLAG_ACTIVITY_NEW_TASK
                | Intent.FLAG_ACTIVITY_MULTIPLE_TASK
                | Intent.FLAG_ACTIVITY_EXCLUDE_FROM_RECENTS);
        intent.putExtra(Intent.EXTRA_PACKAGE_NAME, s.packageName);
        intent.putExtra(Intent.EXTRA_REMOTE_CALLBACK, callback);

        mAm.mHandler.post(new Runnable() {
            @Override
            public void run() {
                mAm.mContext.startActivityAsUser(intent, new UserHandle(userId));
            }
        });
    }

    final long origId = Binder.clearCallingIdentity();

    try {
        ...
        // 如果这时 Service 还没有被创建,则创建 Service 实例
        if ((flags&Context.BIND_AUTO_CREATE) != 0) {
            s.lastActivity = SystemClock.uptimeMillis();
            if (bringUpServiceLocked(s, service.getFlags(), callerFg, false,
                    permissionsReviewRequired) != null) {
                return 0;
            }
        }
        ...
        if (s.app != null && b.intent.received) {
            // Service 已经在运行了,就可以直接进行 connect
            // 此处的 connected 是 IServiceConnection.aidl 中定义的,这个方法由 LoadedApk 来实现,具体查看『关于 Context』一文,此处略过
            // 最后会调用到 ServiceConnection.onServiceConnected() 方法,完成了绑定工作
            try {
                c.conn.connected(s.name, b.intent.binder, false);
            } catch (Exception e) {
                Slog.w(TAG, "Failure sending service " + s.shortInstanceName
                        + " to connection " + c.conn.asBinder()
                        + " (in " + c.binding.client.processName + ")", e);
            }

            // 如果是重新绑定
            if (b.intent.apps.size() == 1 && b.intent.doRebind) {
                requestServiceBindingLocked(s, b.intent, callerFg, true);
            }
        // 如果是第一次绑定
        } else if (!b.intent.requested) {
            requestServiceBindingLocked(s, b.intent, callerFg, false);
        }

        getServiceMapLocked(s.userId).ensureNotStartingBackgroundLocked(s);

    } finally {
        Binder.restoreCallingIdentity(origId);
    }

    return 1;
}

private final boolean requestServiceBindingLocked(ServiceRecord r, IntentBindRecord i,
        boolean execInFg, boolean rebind) throws TransactionTooLargeException {
    ...
    r.app.thread.scheduleBindService(r, i.intent.getIntent(), rebind,
            r.app.getReportedProcState());
    ...
}
继续交给 ActivityThread 去做这件事,经过发送BIND_SERVICE的消息后,来到了ActivityThread.handleBindService()方法:
// android.app.ActivityThread

private void handleBindService(BindServiceData data) {
    Service s = mServices.get(data.token);

    if (s != null) {
        try {
            data.intent.setExtrasClassLoader(s.getClassLoader());
            data.intent.prepareToEnterProcess();
            try {
                if (!data.rebind) {
                    // 调用 Servcie 对象的 onBind 生命周期方法
                    IBinder binder = s.onBind(data.intent);
                    ActivityManager.getService().publishService(
                            data.token, data.intent, binder);
                } else {
                    // 调用 Servcie 对象的 onRebind 生命周期方法
                    s.onRebind(data.intent);
                    ActivityManager.getService().serviceDoneExecuting(
                            data.token, SERVICE_DONE_EXECUTING_ANON, 0, 0);
                }
            } catch (RemoteException ex) {
                throw ex.rethrowFromSystemServer();
            }
        } catch (Exception e) {
            if (!mInstrumentation.onException(s, e)) {
                throw new RuntimeException(
                        "Unable to bind to service " + s
                        + " with " + data.intent + ": " + e.toString(), e);
            }
        }
    }
}
又回到了 ActivityManagerService 中。这里我们看到了两个方法publishService()和serviceDoneExecuting()。追踪下去,发现publishService()方法最终还是调用了 LoadedApk.connected() 方法;而serviceDoneExecuting()方法并没有,因为这个方法是在 rebind 的情况下才会调用,刚才在 ActiveServices.bindServiceLocked 已经针对 rebind 情况调用过一次 LoadedApk.connected() 了。
至此,绑定 Service 的启动完成。
同样地,我们使用一张时序图来展示一下这个过程:
IntentService 原理解析
IntentService 的特点就不再赘述了,我们直接看它关键的代码,然后再解释它的原理:
public abstract class IntentService extends Service {
    // 有自己的 Looper
    private volatile Looper mServiceLooper;
    // 有自定义的 Handler
    private volatile ServiceHandler mServiceHandler;
    private String mName;
    private boolean mRedelivery;

    // 将 Handler 绑定到初始化的线程中
    private final class ServiceHandler extends Handler {
        public ServiceHandler(Looper looper) {
            super(looper);
        }

        @Override
        public void handleMessage(Message msg) {
            onHandleIntent((Intent)msg.obj);
            stopSelf(msg.arg1);
        }
    }

    // 传入 name 以供内部的 HandlerThread 使用,方便进行调试
    public IntentService(String name) {
        super();
        mName = name;
    }

    // 设置 intent 是否会被重新传递
    //
    // 如果设置为 true,onStartCommand() 会返回 Serivce.START_REDELIVER_INTENT,这种情况下,
    // 如果 onHandleIntent() 还没有执行完返回,进程就死掉了,这时进程会被重启然后重新传递刚才的 intent。
    // 如果之前发送了多个 intent (其他的在等待),只有最近发送的一个能保证被送达(其他的不一定了)。
    //
    // 如果设置为 false onStartCommand() 会返回 Serivce.START_NOT_STICKY,如果进行死掉,intent 也就随风消散了
    //
    public void setIntentRedelivery(boolean enabled) {
        mRedelivery = enabled;
    }

    @Override
    public void onCreate() {
        super.onCreate();
        // 新建了一个局部的 HandlerThread,也即不允许外部直接管理这个线程的状态。
        HandlerThread thread = new HandlerThread("IntentService[" + mName + "]");
        thread.start();

        mServiceLooper = thread.getLooper();
        mServiceHandler = new ServiceHandler(mServiceLooper);
    }

    @Override
    public void onStart(@Nullable Intent intent, int startId) {
        Message msg = mServiceHandler.obtainMessage();
        msg.arg1 = startId;
        msg.obj = intent;
        mServiceHandler.sendMessage(msg);
    }

    // 不要重写这个方法
    @Override
    public int onStartCommand(@Nullable Intent intent, int flags, int startId) {
        onStart(intent, startId);
        return mRedelivery ? START_REDELIVER_INTENT : START_NOT_STICKY;
    }

    @Override
    public void onDestroy() {
        mServiceLooper.quit();
    }

    // 除非你需要绑定这个服务,否则不用重写这个方法
    @Override
    @Nullable
    public IBinder onBind(Intent intent) {
        return null;
    }

    // 唯一需要重写的的方法,在这里可以处理调用者发送来的数据
    @WorkerThread
    protected abstract void onHandleIntent(@Nullable Intent intent);
}
可见这个类并不是很神秘:
- 继承了 Service 类;
- 重写了
onCreate()方法,并在其中定义了一个局部的 HandlerThread,并不允许外部直接访问; - 定义了一个 ServiceHandler 并与新建的 HandlerThread 绑定;
- 重写了
onStart()方法,在每次启动服务调用到onStartCommand()的时候,调用onStart(),并将消息传递给 ServiceHandler; - 定义了一个抽象方法
onHandleIntent(Intent)供子类使用,用于真正处理请求。
这个类虽然很常用,但是 Google 决定在 Android R(Android 11)中,将会废弃这个类,原因与最开始提到的『后台操作限制』相同,一个总是在后台运行的服务,必然会造成资源的消耗与浪费。Android 现在大力推宠的是 androidx 中的 WorkManager 和 JobIntentService,我将会在其他的文章里讲解。