在 Android 开发中,最常打交道的就是 Context 了,我们创建 View/ViewGroup 要使用 Context;启动 Activity 需要 Context;新建 Service 需要 Context;哪怕是插件化、组件化开发中,最麻烦的部分也是使用 Context。
那么,既然这个东西这么重要,我们这篇文章就来说说 Context 与它的朋友们。
Context 介绍
Context 在英文中的意思是『上下文』,但在 Android 系统中,我更愿意将其称之为『执行环境』。比如创建 View/ViewGroup,我传入 Context,意在告诉 View/ViewGroup,你当前是在什么环境下被创建的,包括你在哪个进程里,包名是啥,pid 是啥,线程 tid 是啥,等等等等。如果没有这个 Context,被创建的 View/ViewGroup 也会发出灵魂三问:我是谁?我在哪儿?我要干什么?
大名鼎鼎的 Activity、Service 都是 Context 的派生类。如果有人有一天问你:Activity 为啥不是直接继承自 Context 的?ContextWrapper 是个啥?ContextImpl 又是个啥?Activity 的 Context 和 Application 的 Context 有啥区别?又有啥相同的地方?我希望你能自信地用这篇文章砸到他脸上,然后说:自己看!!!
Context 类与相关类
本人倾情手绘,展示了 Context 相关的类图,请上眼:

???不好意思,放错图了,是这个:
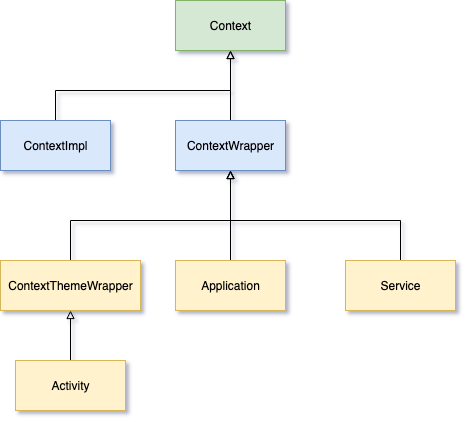
我们由上自下来讲讲这些类。
Context
我们先来看看 Android 源码中对于 Context 的定义:
Interface to global information about an application environment. This is an abstract class whose implementation is provided by the Android system. It allows access to application-specific resources and classes, as well as up-calls for application-level operations such as launching activities, broadcasting and receiving intents, etc.
大意是 Context 是一个为 App 运行提供全局信息的接口(是广义上的接口,不是 interface)。这是一个抽象类,其具体实例由 Android 系统提供。它允许你访问一些 App 指定的资源和类,还有执行一些应用级别的操作比如启动 Activity 啦,广播啦,获取 intent 啦,等等。
它提供了很多方法,比较常用的有getApplicationContext(),getAssets(),getString(int),startActivity(),startService(),sendBroadcast()等等等等。
那么由上面的定义我们知道,Context 是个抽象类,这些方法具体是由谁来实现的?又是何时初始化的?这里我们需要介绍下一个类—— ContextWrapper。
ContextWrapper
如果没听过『装饰器模式』的话,可以看一下这一小段,如果你已经熟知『装饰器模式』,则可以温故而知新。
所谓『装饰器模式』,即给现有的对象提供新的功能,同时又不改变其结构。这种设计模式属性结构型设计,相当于对现有类的一个包装。
听起来是不是有点像代理?对!与代理十分类似,都是在原有类的基础上对其进行拓展,以达到我们的目的。
也有人问了,我继承不就完了,干嘛还要使用什么装饰器模式?我们要知道,Java 是单继承,如果你多级包装,子类会越来越多,层级越来越深,而利用装饰器模式则可以优雅解决这个问题。它动态地给一个对象添加一些额外的职责。就增加功能来说,装饰器模式相比继承更为灵活。
ContexWrapper 是在何处使用的装饰器模式呢?我们来看看源码:
public class ContextWrapper extends Context {
    Context mBase;

    public ContextWrapper(Context base) {
        mBase = base;
    }
看到没有,ContextWrapper 中包含了一个 Context 的实例,在后续的方法调用中,全部都会调用mBase.xxx()方法来完成任务:
@Override
public String getPackageName() {
    return mBase.getPackageName();
}

@Override
public SharedPreferences getSharedPreferences(String name, int mode) {
    return mBase.getSharedPreferences(name, mode);
}

@Override
public Resources getResources() {
    return mBase.getResources();
    }
而 Activity、Application、Service 等,则是 ContexWrapper 的具体装饰者,每个人都有每个人的特点。
在上面的代码中,我们看到,ContextWrapper 中有 Context 类型的对象mBase,这个对象是在何时被传进来的呢?
Application
我们以 Application 为例,查看它调用attachBaseContext()的位置:
// android.app.Application.java

@UnsupportedAppUsage
final void attach(Context context) {
    attachBaseContext(context);
    mLoadedApk = ContextImpl.getImpl(context).mPackageInfo;
}
我们继续向上找,看谁调用了Application.attach():
// android.app.Instrumentation.java

static public Application newApplication(Class<?> clazz, Context context)
        throws InstantiationException, IllegalAccessException,
        ClassNotFoundException {
    Application app = (Application)clazz.newInstance();
    app.attach(context);
    return app;
}
这里是使用反射机制获取了 Application 的 class,并新建了实例。那么,继续向上走:
// android.app.LoadedApk.java

public Application makeApplication(boolean forceDefaultAppClass,
        Instrumentation instrumentation) {
    if (mApplication != null) {
        return mApplication;
    }

    Trace.traceBegin(Trace.TRACE_TAG_ACTIVITY_MANAGER, "makeApplication");

    Application app = null;

    String appClass = mApplicationInfo.className;
    if (forceDefaultAppClass || (appClass == null)) {
        appClass = "android.app.Application";
    }

    try {
        java.lang.ClassLoader cl = getClassLoader();
        if (!mPackageName.equals("android")) {
            Trace.traceBegin(Trace.TRACE_TAG_ACTIVITY_MANAGER,
                    "initializeJavaContextClassLoader");
            initializeJavaContextClassLoader();
            Trace.traceEnd(Trace.TRACE_TAG_ACTIVITY_MANAGER);
        }
        ContextImpl appContext = ContextImpl.createAppContext(mActivityThread, this); // 1
        app = mActivityThread.mInstrumentation.newApplication(
                cl, appClass, appContext);   // 2
        appContext.setOuterContext(app);
    } catch (Exception e) {
        if (!mActivityThread.mInstrumentation.onException(app, e)) {
            Trace.traceEnd(Trace.TRACE_TAG_ACTIVITY_MANAGER);
            throw new RuntimeException(
                "Unable to instantiate application " + appClass
                + ": " + e.toString(), e);
        }
    }
    mActivityThread.mAllApplications.add(app);
    mApplication = app;

    if (instrumentation != null) {
        try {
            instrumentation.callApplicationOnCreate(app);  // 3
        } catch (Exception e) {
            if (!instrumentation.onException(app, e)) {
                Trace.traceEnd(Trace.TRACE_TAG_ACTIVITY_MANAGER);
                throw new RuntimeException(
                    "Unable to create application " + app.getClass().getName()
                    + ": " + e.toString(), e);
            }
        }
    }

    // Rewrite the R 'constants' for all library apks.
    SparseArray<String> packageIdentifiers = getAssets().getAssignedPackageIdentifiers();
    final int N = packageIdentifiers.size();
    for (int i = 0; i < N; i++) {
        final int id = packageIdentifiers.keyAt(i);
        if (id == 0x01 || id == 0x7f) {
            continue;
        }

        rewriteRValues(getClassLoader(), packageIdentifiers.valueAt(i), id);
    }

    Trace.traceEnd(Trace.TRACE_TAG_ACTIVITY_MANAGER);

    return app;
}
可以看到,在这段代码中,主要做了三件事:
- 使用
ContextImpl.createAppContext()创建了 ContextImpl 的实例 - 将 ContextImpl 的实例塞给了 Application
- 调用了
Application.onCreate()生命周期方法
那么至此,我们知道了,Application 中的mBase,实际上是 ContextImpl 的实例。这与上面的装饰器模式是不冲突的。
ContextThemeWrapper
Activity 直接继承自 ContextThemeWrapper,它是 ContextWrapper 的一个拓展类,里面包含了主题相关的变量:
public class ContextThemeWrapper extends ContextWrapper {
    private int mThemeResource;
    private Resources.Theme mTheme;
    private LayoutInflater mInflater;
    private Configuration mOverrideConfiguration;
    private Resources mResources;
}
Application 和 Service 都是继承自 ContextWrapper,里面没有包含主题相关的变量,所以,只有 Activity 能够使用主题资源。
Activity
对于 Activity,我们也必须分析一下:
Activity 中的attachBaseContext()如下:
@Override
protected void attachBaseContext(Context newBase) {
    super.attachBaseContext(newBase);
    if (newBase != null) {
        newBase.setAutofillClient(this);
        newBase.setContentCaptureOptions(getContentCaptureOptions());
    }
}
而这个方法是在 Activity 创建过程中的重要方法attach()中调用的:
final void attach(Context context, ActivityThread aThread,
            Instrumentation instr, IBinder token, int ident,
            Application application, Intent intent, ActivityInfo info,
            CharSequence title, Activity parent, String id,
            NonConfigurationInstances lastNonConfigurationInstances,
            Configuration config, String referrer, IVoiceInteractor voiceInteractor,
            Window window, ActivityConfigCallback activityConfigCallback, IBinder assistToken) {
        attachBaseContext(context);
        ...
}
这个方法又是在 ActivityThread 中被调用:
private Activity performLaunchActivity(ActivityClientRecord r, Intent customIntent) {
    ...
    ContextImpl appContext = createBaseContextForActivity(r);  // 1
    Activity activity = null;
    try {
        java.lang.ClassLoader cl = appContext.getClassLoader();
        activity = mInstrumentation.newActivity(
                cl, component.getClassName(), r.intent);  // 2
        StrictMode.incrementExpectedActivityCount(activity.getClass());
        r.intent.setExtrasClassLoader(cl);
        r.intent.prepareToEnterProcess();
        if (r.state != null) {
            r.state.setClassLoader(cl);
        }
    } catch (Exception e) {
        if (!mInstrumentation.onException(activity, e)) {
            throw new RuntimeException(
                "Unable to instantiate activity " + component
                + ": " + e.toString(), e);
        }
    }
    ...
    activity.attach(appContext, this, getInstrumentation(), r.token,
                    r.ident, app, r.intent, r.activityInfo, title, r.parent,
                    r.embeddedID, r.lastNonConfigurationInstances, config,
                    r.referrer, r.voiceInteractor, window, r.configCallback,
                    r.assistToken);  // 3
    ...
    if (r.isPersistable()) {
        mInstrumentation.callActivityOnCreate(activity, r.state, r.persistentState); // 4
    } else {
        mInstrumentation.callActivityOnCreate(activity, r.state); // 4
    }
    ...
}
这段代码大体分为4步:
- 使用
createBaseContextForActivity()方法创建 ContextImpl 实例 - 创建 Activity 实例
- 调用
Activity.attach()将 ContextImpl 实例赋值到 Activity 的mBase成员变量中 - 调用
Activity.onCreate()生命周期方法
ContextImpl
我们在上面知道了 ContextWrapper 中包装的这个 Context 对象,都是 ContextImpl 的实例,那这个类到底为什么如此手眼通天?我们来看看这个类。
这个类其实就是 Context 抽象类的具体实现,与资源、系统服务的通信,全部靠这个类。说这个类对于开发者来说是最重要的类,也不并不过分。它将我们上面提到的诸如startActivity()、getAssets()、getResources()之类的方法都实现了,我们来看看它的部分代码:
// android.app.ContextImpl.java

class ContextImpl extends Context {
    ...
    // 我们获取的 SharedPreference,来自于这儿,具体实现看来是 SharedPreferencesImpl 类,这里不多分析
    private static ArrayMap<String, ArrayMap<File, SharedPreferencesImpl>> sSharedPrefsCache;
    ...
    final @NonNull ActivityThread mMainThread;  // 主线程
    final @NonNull LoadedApk mPackageInfo;  // Apk 信息,包含包名、版本号等信息
    private @Nullable ClassLoader mClassLoader;  // 加载 ContextImpl 类时使用的 ClassLoader
    ...
    private @NonNull Resources mResources;  // getResources() 拿到的对象
    ...
    private Context mOuterContext;   // 持有着外部 Context 的引用,也即 ContextWrapper 的实例
    ...
    private PackageManager mPackageManager;
    ...
    private final Object mSync = new Object();
    ...
    // 几个常用的路径
    @GuardedBy("mSync")
    private File mDatabasesDir;
    @GuardedBy("mSync")
    @UnsupportedAppUsage
    private File mPreferencesDir;
    @GuardedBy("mSync")
    private File mFilesDir;
    @GuardedBy("mSync")
    private File mNoBackupFilesDir;
    @GuardedBy("mSync")
    private File mCacheDir;
    @GuardedBy("mSync")
    private File mCodeCacheDir;

    ...
    @Override
    public Context getApplicationContext() {
        return (mPackageInfo != null) ?
                mPackageInfo.getApplication() : mMainThread.getApplication();
    }
    ...
    @Override
    public String getPackageName() {
        if (mPackageInfo != null) {
            return mPackageInfo.getPackageName();
        }
        // No mPackageInfo means this is a Context for the system itself,
        // and this here is its name.
        return "android";
    }
    ...
    @Override
    public void startActivity(Intent intent, Bundle options) {
        warnIfCallingFromSystemProcess();

        // Calling start activity from outside an activity without FLAG_ACTIVITY_NEW_TASK is
        // generally not allowed, except if the caller specifies the task id the activity should
        // be launched in. A bug was existed between N and O-MR1 which allowed this to work. We
        // maintain this for backwards compatibility.
        final int targetSdkVersion = getApplicationInfo().targetSdkVersion;

        if ((intent.getFlags() & Intent.FLAG_ACTIVITY_NEW_TASK) == 0
                && (targetSdkVersion < Build.VERSION_CODES.N
                        || targetSdkVersion >= Build.VERSION_CODES.P)
                && (options == null
                        || ActivityOptions.fromBundle(options).getLaunchTaskId() == -1)) {
            throw new AndroidRuntimeException(
                    "Calling startActivity() from outside of an Activity "
                            + " context requires the FLAG_ACTIVITY_NEW_TASK flag."
                            + " Is this really what you want?");
        }
        mMainThread.getInstrumentation().execStartActivity(
                getOuterContext(), mMainThread.getApplicationThread(), null,
                (Activity) null, intent, -1, options);
    }
    ...
    @Override
    public void sendBroadcast(Intent intent) {
        warnIfCallingFromSystemProcess();
        String resolvedType = intent.resolveTypeIfNeeded(getContentResolver());
        try {
            intent.prepareToLeaveProcess(this);
            ActivityManager.getService().broadcastIntent(
                    mMainThread.getApplicationThread(), intent, resolvedType, null,
                    Activity.RESULT_OK, null, null, null, AppOpsManager.OP_NONE, null, false, false,
                    getUserId());
        } catch (RemoteException e) {
            throw e.rethrowFromSystemServer();
        }
    }
    ...
}
还有很多,就不一一贴出了。
由这些代码我们现在能知道,我们知道,当我们使用 Context 中的方法时,真正的实现全部都在这里。当然,再具体的工作比如创建新的 Activity 实例,还得交由 ActivityThread 去做,暂且不表。
getContext() 和 getApplicationContext()
这两个方法似乎在 Activity 和 Application 中都能调用。那他们是同一个对象吗?有什么不同呢?
由上面 Application 和 Activity 部分我们知道,塞给 Application 和 Activity 的,是new了两次的 ContextImpl 实例,它们显然不是同一个对象。
那他们的区别在哪?先从高一点的层面来说,Application Context 显然无论你在哪儿调用,获取的都是同一个 ContextImpl 实例;但 Activity Context 获取的只能是当前 Activity 的 ContextImpl 实例,这样一来,一下子就能区分两种 Context 的使用场景。
如果从底层的角度呢,我们就要分别看看这两个 ContextImpl 创建的过程。在此之前,我先上一段 ContextImpl 的构造函数,方便下面进行对比:
private ContextImpl(@Nullable ContextImpl container, @NonNull ActivityThread mainThread,
        @NonNull LoadedApk packageInfo, @Nullable String splitName,
        @Nullable IBinder activityToken, @Nullable UserHandle user, int flags,
        @Nullable ClassLoader classLoader, @Nullable String overrideOpPackageName) {
    ...
}
Application 中 ContextImpl 的创建过程
static ContextImpl createAppContext(ActivityThread mainThread, LoadedApk packageInfo,
        String opPackageName) {
    if (packageInfo == null) throw new IllegalArgumentException("packageInfo");
    ContextImpl context = new ContextImpl(null, mainThread, packageInfo, null, null, null, 0,
            null, opPackageName);
    context.setResources(packageInfo.getResources());
    return context;
}
可以看到,平淡无奇地调用了 ContextImpl 的构造函数,平淡无奇地给它塞了个 resource,就平淡无奇地返回了。这也就意味着,使用 Application Context 可以获取上下文中所有的基本信息,包括 PackageName、Resources 等。
Activity 中 ContextImpl 的创建过程
    static ContextImpl createActivityContext(ActivityThread mainThread,
            LoadedApk packageInfo, ActivityInfo activityInfo, IBinder activityToken, int displayId,
            Configuration overrideConfiguration) {
        if (packageInfo == null) throw new IllegalArgumentException("packageInfo");

        String[] splitDirs = packageInfo.getSplitResDirs();
        ClassLoader classLoader = packageInfo.getClassLoader();

        if (packageInfo.getApplicationInfo().requestsIsolatedSplitLoading()) {
            Trace.traceBegin(Trace.TRACE_TAG_RESOURCES, "SplitDependencies");
            try {
                classLoader = packageInfo.getSplitClassLoader(activityInfo.splitName);
                splitDirs = packageInfo.getSplitPaths(activityInfo.splitName);
            } catch (NameNotFoundException e) {
                // Nothing above us can handle a NameNotFoundException, better crash.
                throw new RuntimeException(e);
            } finally {
                Trace.traceEnd(Trace.TRACE_TAG_RESOURCES);
            }
        }

        ContextImpl context = new ContextImpl(null, mainThread, packageInfo, activityInfo.splitName,
                activityToken, null, 0, classLoader, null);

        // Clamp display ID to DEFAULT_DISPLAY if it is INVALID_DISPLAY.
        displayId = (displayId != Display.INVALID_DISPLAY) ? displayId : Display.DEFAULT_DISPLAY;

        final CompatibilityInfo compatInfo = (displayId == Display.DEFAULT_DISPLAY)
                ? packageInfo.getCompatibilityInfo()
                : CompatibilityInfo.DEFAULT_COMPATIBILITY_INFO;

        final ResourcesManager resourcesManager = ResourcesManager.getInstance();

        // Create the base resources for which all configuration contexts for this Activity
        // will be rebased upon.
        context.setResources(resourcesManager.createBaseActivityResources(activityToken,
                packageInfo.getResDir(),
                splitDirs,
                packageInfo.getOverlayDirs(),
                packageInfo.getApplicationInfo().sharedLibraryFiles,
                displayId,
                overrideConfiguration,
                compatInfo,
                classLoader));
        context.mDisplay = resourcesManager.getAdjustedDisplay(displayId,
                context.getResources());
        return context;
    }
嗯。。明显不一样。一眼就能看出,Activity 的 Context 明显是用心的了好吗!!它里面会有一些与 Display 相关的信息,而 Application 的 Context 则没有。
FAQ
似乎还有个
getApplication()方法啊?这是个什么鬼?它跟getApplicationContext()有什么区别?我们先看一下这两个方法获取的是不是同一个对象:
Context a = getApplication();
Context b = getApplicationContext();

System.out.println(a);
System.out.println(b);
输出如下:
I/System.out: android.app.Application@206b17e
I/System.out: android.app.Application@206b17e
看来他们是同一个对象。那么 Android 为何要设计这两种方法,来获取同一个对象呢?我反正是没想明白。我觉得这很有可能是有什么历史原因造成的。虽然目前看来他们返回的是同一个对象,我们也不敢保证将来也会是这样。
如果你想要获取在 Mainfest 中注册的那个 Application,你绝对不要调用 getApplicationContext() 然后强转成你的 Application,它俩并不是同一个实例。这也就意味着一件事,如果你在使用 BroadcastReceiver 时,虽然它不是一个 Context 对象,但在它的
onReceive()方法中你能拿到 Context,你也只能调用getApplicationContext()方法。若想知道为什么两个是同一个实例,看这篇文章。
我们知道,四大组件中也会有 Context 出现(虽然 BroadcastReceiver、Service、ContentProvider 的 Context 是手动塞进去的),那么它们都能做些什么?
来张表你就知道了(做成了图片,表会溢出,比较难看):
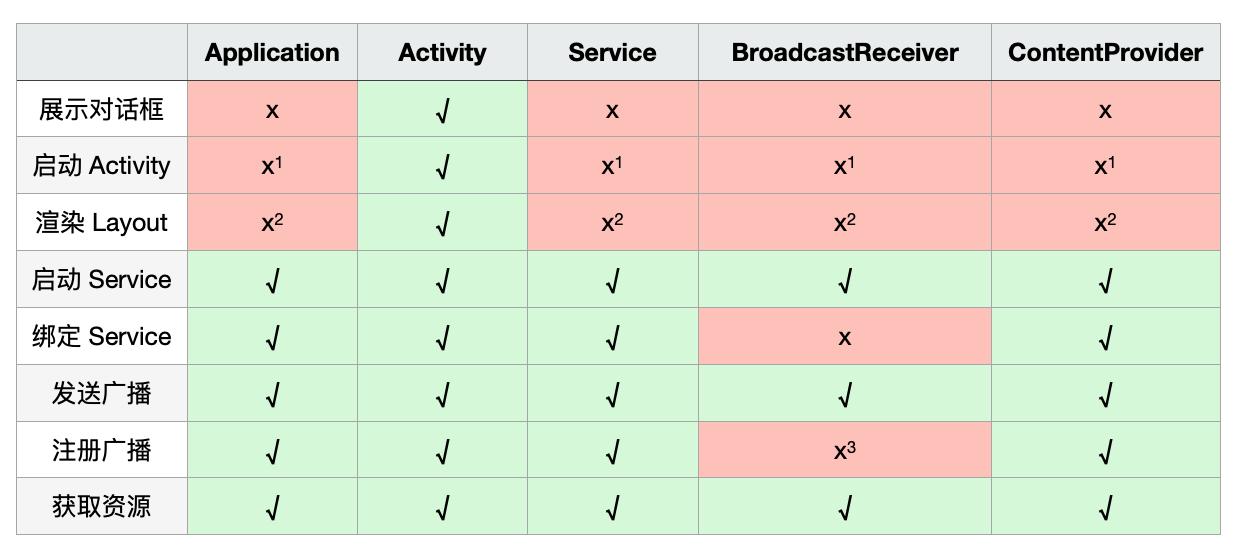
标注1:这几种情况下其实也能启动 Activity,但是必须要加上
FLAG_ACTIVITY_NEW_TASK标识位,否则会抛出异常。但这种情况下启动 Activity 会让应用看起来『不那么正常』,所以尽量还是避免使用。
标注2:这几种情况下能正常渲染 Layout,但是使用的是 Android 的默认主题,与系统定义的主题无关了。
标注3:如果 receiver 是 null 时,可以使用,用于在 Android 4.2 及以上时获取 Sticky Broadcast 的 value。getBaseContext()有什么用?如果你想在一个 Context 中访问另一个 Context 时使用。