Activity 几乎是所有 Android 开发者最熟悉的陌生人了。
说它熟悉,是因为每个开发者在进行开发时,第一个要面对的对象就是 Activity,应用界面的跳转、UI的显示全部都要依托Activity。
说它陌生,是因为几乎很少有开发者能把 Activity、Window、View、DecorView、WindowManager、ViewRootImpl 错综复杂的关系理清。
当我们打开 Android Studio,建立一个新的应用,编译启动项目,手机上出现了『Hello World!』,有没有想过这些问题:
Activity 是由谁来实例化的?
Window 是个啥?
经常听说 DecorView,它是个普通的 View 吗?它的作用是什么?
WindowManager 起了什么作用?
Activity 是如何将内容显示到屏幕上的?
宋慧乔与宋仲基为什么要离婚?
带着这些问题,我们来揭开它的面纱,一起走近科学,看看『Hello World!』背后的故事。
万物之源 - Activity
在每一个 Application 之下,就是各种各样的 Activity 了,要呈现任何内容,都要经过 Activity 之手。那么 Activity 是以什么形式显示的呢?
在官方文档上,是这样定义 Activity 的。
An activity is a single, focused thing that the user can do. Almost all activities interact with the user, so the Activity class takes care of creating a window for you in which you can place your UI with setContentView(View). While activities are often presented to the user as full-screen windows, they can also be used in other ways: as floating windows (via a theme with R.attr.windowIsFloating set), Multi-Window mode or embedded into other windows.
机翻:
Activity 是一个独立的,能与用户交互的东西。几乎所有的Activity都会与用户产生交互,所以Activity类会帮你创建一个Window,来让你通过setContentView(View)的方式,把UI展示出来。通常情况下,与用户交互的都是全屏Window,当然也可以有悬浮窗(通过在主题中设置R.attr.windowIsFloating来启用)、多窗口,或者集成到其他的Window中。
我们来简单看一下Activity之下的内容的层级关系:
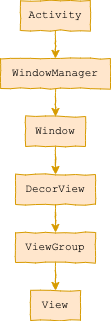
可以看出,Activity 中会有 WindowManger 来管理 Window,而 Window 之下就是各种 ViewGroup 和 View 了。我们是怎么的推导出这个层级关系的呢?我们先从 Activity 的创建开始。
Activity的实例是由 ActivityThread 创建的,在其中有个名为performLaunchActivity()的方法,在这里面创建了Activity的实例。
// ActivityThread.java

/**  Core implementation of activity launch. */
private Activity performLaunchActivity(ActivityClientRecord r, Intent customIntent) {
    ...
    ComponentName component = r.intent.getComponent();
    ...
    ContextImpl appContext = createBaseContextForActivity(r);
    Activity activity = null;
    try {
        java.lang.ClassLoader cl = appContext.getClassLoader();
        activity = mInstrumentation.newActivity(
                cl, component.getClassName(), r.intent);
        StrictMode.incrementExpectedActivityCount(activity.getClass());
        r.intent.setExtrasClassLoader(cl);
        r.intent.prepareToEnterProcess();
        if (r.state != null) {
            r.state.setClassLoader(cl);
        }
    } catch (Exception e) {
        if (!mInstrumentation.onException(activity, e)) {
            throw new RuntimeException(
                "Unable to instantiate activity " + component
                + ": " + e.toString(), e);
        }
    }
    ...
    Window window = null;
    if (r.mPendingRemoveWindow != null && r.mPreserveWindow) {
        window = r.mPendingRemoveWindow;
        r.mPendingRemoveWindow = null;
        r.mPendingRemoveWindowManager = null;
    }
    appContext.setOuterContext(activity);
    activity.attach(appContext, this, getInstrumentation(), r.token,
            r.ident, app, r.intent, r.activityInfo, title, r.parent,
            r.embeddedID, r.lastNonConfigurationInstances, config,
            r.referrer, r.voiceInteractor, window, r.configCallback,
            r.assistToken);
}
可以看到,Activity的实例是由Instrumentation来创建的,而且将ClassLoader传入,看来是利用了反射原理创建的。具体的我们之后再分析。#FLAG
来从Activity.attach()开始看看源码吧。
// Activity.java

final void attach(Context context, ActivityThread aThread,
        Instrumentation instr, IBinder token, int ident,
        Application application, Intent intent, ActivityInfo info,
        CharSequence title, Activity parent, String id,
        NonConfigurationInstances lastNonConfigurationInstances,
        Configuration config, String referrer, IVoiceInteractor voiceInteractor,
        Window window, ActivityConfigCallback activityConfigCallback, IBinder assistToken) {
    ...
    mWindow = new PhoneWindow(this, window, activityConfigCallback);
    ...
    mWindow.setWindowManager(
        (WindowManager)context.getSystemService(Context.WINDOW_SERVICE),
        mToken, mComponent.flattenToString(),
        (info.flags & ActivityInfo.FLAG_HARDWARE_ACCELERATED) != 0);
    ...
    mWindowManager = mWindow.getWindowManager();
}
由上面的代码我们能够知道,Activity中的Window实例是一个叫PhoneWindow的东西。Activity在这里创建了一个新的PhoneWindow,并给它设置一个WindowManager。
在看PhoneWindow之前,先看看Window的定义:
// Window.java
/**
 * 一个抽象类,top-level的窗口,用来呈现样式,掌管行为。
 * 该类的实例应该被用做最顶层的视图,并且需要被添加到 window manager。
 * 它提供了标准的 UI 策略包括但不限于背景、标题区域、默认的按键处理等等。
 *
 * 目前该类唯一的实现类就是 android.view.PhoneWindow,当你需要一个Window的时候,就得实例化这个类。
 */
public abstract class Window {
    ...
}
做为Android中Window类的唯一实现类,我们再看看PhoneWindow的定义:
// PhoneWindow.java
public class PhoneWindow extends Window implements MenuBuilder.Callback {
    ...
    // PhoneWindow中的顶级View——DecorView
    private DecorView mDecor;
    ...
    boolean mIsFloating;  // 是否为悬浮窗
    ...
    private LayoutInflater mLayoutInflater;  // LayoutInflater
    private TextView mTitleView;  // 窗口标题
    ...
    private AudioManager mAudioManager;
    private KeyguardManager mKeyguardManager;
    private MediaSessionManager mMediaSessionManager; // 如Window中所说的,包含一些事件的处理
    ...
在PhoneWindow的成员变量里,我们看到了DecorView。可见Window的顶级View就是DecorView了。而DecorView又是一个ViewGroup,它可以拥有无数的子View,所以刚才图里的层级关系得到了佐证。
一人之下,万人之上 - Window
我们知道,微软 Windows® 操作系统中有窗口(Window)的概念,那么在 Android 中有没有这个概念呢?
答案是有的。Activity 是附加在 Window 上展示的,还有例如 Dialog、Toast 也是会单独展示在一个 Window 上。
刚才我们说过了,Acitivty中,用于显示内容的,就是Window了。那么Window的内容来自于哪儿呢?
我们从上面ActivityThread.performLaunchActivity()方法继续向下走:
// ActivityThread.jaa
    ...
    activity.attach(appContext, this, getInstrumentation(), r.token,
            r.ident, app, r.intent, r.activityInfo, title, r.parent,
            r.embeddedID, r.lastNonConfigurationInstances, config,
            r.referrer, r.voiceInteractor, window, r.configCallback,
            r.assistToken);
    ...
    activity.mCalled = false;
    if (r.isPersistable()) {
        mInstrumentation.callActivityOnCreate(activity, r.state, r.persistentState);
    } else {
        mInstrumentation.callActivityOnCreate(activity, r.state);
    }
看到这里了吧,调用了Activity的onCreate()方法。
我们知道,在Activity的onCreate()方法中,绝大多数情况下,我们要使用setContentView(R.layout.layout_main)来显示内容,如果这句代码被注释掉,那Activity中就是一片空白。好,我们就由此为入口,看看R.layout.layout_main究竟是怎样被添加到Window里的。
setContentView()的源码如下,非常简单:
// Activity.java
/**
    * Set the activity content from a layout resource.  The resource will be
    * inflated, adding all top-level views to the activity.
    *
    * @param layoutResID Resource ID to be inflated.
    */
public void setContentView(@LayoutRes int layoutResID) {
    getWindow().setContentView(layoutResID);
    // 设置actionBar
    initWindowDecorActionBar();
}
高尔基先生教导我们:事出反常必有妖。越是简单的东西,背后的东西肯定越复杂,我们来看看getWindow().setContentView(layoutResID)这句代码都经历了些什么。
Activity.getWindow()获取的是其成员变量PhoneWindow,所以这句代码其实是调用了PhoneWindow.setContentView():
// PhoneWindow.java
@Override
public void setContentView(int layoutResID) {
    // Note: FEATURE_CONTENT_TRANSITIONS may be set in the process of installing the window
    // decor, when theme attributes and the like are crystalized. Do not check the feature
    // before this happens.
    // 初始化DecorView和mContentParent
    if (mContentParent == null) {
        installDecor();
    } else if (!hasFeature(FEATURE_CONTENT_TRANSITIONS)) {
        mContentParent.removeAllViews();
    }
    if (hasFeature(FEATURE_CONTENT_TRANSITIONS)) {
        final Scene newScene = Scene.getSceneForLayout(mContentParent, layoutResID,
                getContext());
        transitionTo(newScene);
    } else {
        // 渲染布局
        mLayoutInflater.inflate(layoutResID, mContentParent);
    }
    mContentParent.requestApplyInsets();

    // 通知Activity我初始化完啦!
    final Callback cb = getCallback();
    if (cb != null && !isDestroyed()) {
        cb.onContentChanged();
    }
    mContentParentExplicitlySet = true;
}
这里面我们提取两个点:mContentParent和installDecor()。
mContentParent的声明如下:
// This is the view in which the window contents are placed. It is either
// mDecor itself, or a child of mDecor where the contents go.
ViewGroup mContentParent;
意思是这个ViewGroup放的是Window里的内容。它要么是mDecor(也就是DecorView),要么是mDecor的一个子View。
在第一次初始化的时候,mContentParent显然是null,那其初始化必然就在installDecor()中了。
// PhoneWindow.java
private void installDecor() {
    mForceDecorInstall = false;
    if (mDecor == null) {
        mDecor = generateDecor(-1);
        ...
    } else {
        mDecor.setWindow(this);
    }
    if (mContentParent == null) {
        mContentParent = generateLayout(mDecor);
        // 各种对mContentParent和mDecor的初始化,如Title、Icon等
        ...
    }
}
当初次进入此方法时,mDecor为null,便会调用generateDecor()方法:
// PhoneWindow.java

protected DecorView generateDecor(int featureId) {
    // 系统进程没有 application context,在这种情况下,我们需要直接使用我们现有的 context。
    // 其他的情况下我们直接用 application context,这样就不用太依附于 activity。
    Context context;
    if (mUseDecorContext) {
        Context applicationContext = getContext().getApplicationContext();
        if (applicationContext == null) {
            context = getContext();
        } else {
            context = new DecorContext(applicationContext, getContext());
            if (mTheme != -1) {
                context.setTheme(mTheme);
            }
        }
    } else {
        context = getContext();
    }
    return new DecorView(context, featureId, this, getAttributes());
}
可以看到,在这里创建了DecorView的实例,Window的根View出现了。
并且在installDecor()时,也要初始化mContentParent,通过调用generateLayout(DecorView)实现:
protected ViewGroup generateLayout(DecorView decor) {
    // 各种初始化与条件判断
    ...
    // Inflate the window decor.
    int layoutResource;
    // 判断当前是什么类型的Window,从而给layoutResource赋值特定的id值。
    // 如 R.layout.screen_swipe_dismiss、R.layout.screen_title_icons等
    // 这里也有大量的 requestFeature() 的调用,
    // 也间接解释了为什么 requestFeature() 方法一定要在 setContentView() 之前调用
    ...
    mDecor.startChanging();  // 1
    mDecor.onResourcesLoaded(mLayoutInflater, layoutResource);  // 2
    ViewGroup contentParent = (ViewGroup)findViewById(ID_ANDROID_CONTENT);  // 3
    ...
    mDecor.setWindowFrame(frame);
    mDecor.setElevation(mElevation);
    mDecor.setClipToOutline(mClipToOutline);
    ...
    mDecor.finishChanging(); // 4
    return contentParent;  // 5
}
在这个方法中,使用了刚刚创建的DecorView。
startChanging()方法会将DecorView中的一个mChanging的Flag置为true;该Flag主要目的是防止DecorView收到drawableChanged()事件时,出现冲突。onResourcesLoaded()方法中会调用addView()方法将layoutResource渲染过后的view添加为自身的子View。无论layoutResource最后被赋予什么值,它一定会包含Window.ID_ANROID_CONTENT。Window.ID_ANDROID_CONTENT的定义是这样的:
// Window.java
/**
* 主 layout 的 xml 文件中必须含有的 ID 值
*/
public static final int ID_ANDROID_CONTENT = com.android.internal.R.id.content;
而这个findViewById()是PhoneWindow的父类Window中的方法,如下:
// Window.java
/**
* Finds a view that was identified by the {@code android:id} XML attribute
* that was processed in {@link android.app.Activity#onCreate}.
* <p>
* This will implicitly call {@link #getDecorView} with all of the associated side-effects.
* <p>
* <strong>Note:</strong> In most cases -- depending on compiler support --
* the resulting view is automatically cast to the target class type. If
* the target class type is unconstrained, an explicit cast may be
* necessary.
*
* @param id the ID to search for
* @return a view with given ID if found, or {@code null} otherwise
* @see View#findViewById(int)
* @see Window#requireViewById(int)
*/
@Nullable
public <T extends View> T findViewById(@IdRes int id) {
    return getDecorView().findViewById(id);
}
getDecorView()是Window中的抽象方法,当然由PhoneWindow来实现:
@Override
public final @NonNull View getDecorView() {
    if (mDecor == null || mForceDecorInstall) {
        installDecor();
    }
    return mDecor;
}
说白了,就是拿到了刚刚初始化完的mDecor!DecorView是一个ViewGroup,调用它的findViewById()最终会调用到View.findViewById(),具体的代码就不贴了,无非就是递归查找。
这一句的目的是,找到DecorView中ID值为ID_ANDROID_CONTENT的View,赋值给contentParent。
finishChanging()方法将DecorView中的mChangingFlag置为false,同时调用一下它的drawableChanged()方法。- 返回
contentParent,这样mContentParent初始化完毕。
好,现在mDecor有了,mContentParent有了,就调用
mLayoutInflater.inflate(layoutResID, mContentParent);
来将xml布局文件画到这上面。
经过上面的步骤,现在DecorView已经初始化完毕,可是还没有被添加到Window上呢?
什么时候添加上去的呢?这里必须要介绍Activity的创建与生命周期了。
Activity的创建与生命周期
在上面Activity.attach()方法中,我们看到传入了一个ActivityThread的实例,这个ActivityThread是个啥?
// ActivityThread.java

/**
 * 管理一个应用进程的主线程上的所有执行任务,计划和执行活动、广播和其他的操作,而Activity Manager只管发送请求就好啦
 *
 * {@hide}
 */
public final class ActivityThread extends ClientTransactionHandler {
}
在文章的开头讲过,Activity.attach()是由ActivityThread来调用的,因为Activity的实例就是由ActivityThread来创建的!
那么,它必然也会监听Activity生命周期内的所有事件。
上一张老掉牙的图,来看看Activity的生命周期。
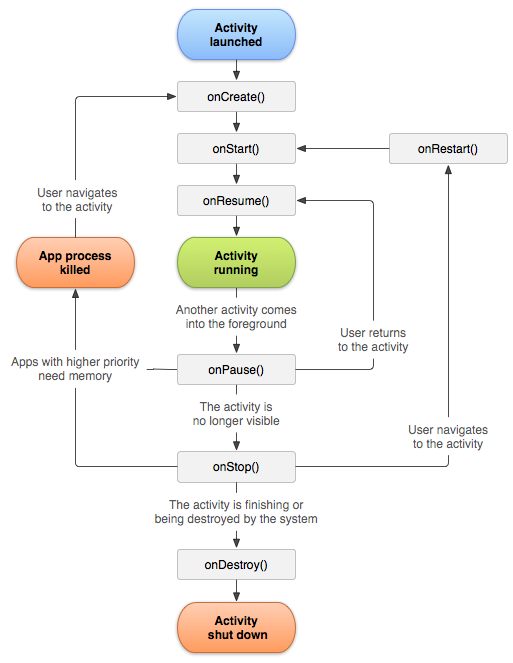
通过查看ActivityThread的代码,我们发现,在handleResumeActivity()方法中,首先会调用 Activity 的onResume()方法,接着会调用 Activity 的makeVisible()方法,正是在makeVisible()方法中,DecorView才真正的完成了显示过程,到这里 Activity 的视图才能被用户看到,代码如下:
// ActivityThread.java
@Override
public void handleResumeActivity(IBinder token, boolean finalStateRequest, boolean isForward,
        String reason) {
    // 这里最终会调用到Activity的 onResume() 方法
    final ActivityClientRecord r = performResumeActivity(token, finalStateRequest, reason);
    ...
    final Activity a = r.activity;
    ...
    // The window is now visible if it has been added, we are not
    // simply finishing, and we are not starting another activity.
    if (!r.activity.mFinished && willBeVisible && r.activity.mDecor != null && !r.hideForNow) {
        if (r.activity.mVisibleFromClient) {
            r.activity.makeVisible();
        }
    }

}
// Activity.java
void makeVisible() {
    if (!mWindowAdded) {
        ViewManager wm = getWindowManager();
        wm.addView(mDecor, getWindow().getAttributes());  // 将DecorView添加到Window上
        mWindowAdded = true;
    }
    mDecor.setVisibility(View.VISIBLE);
}

// getWindowManager()获取的是Activity中的成员变量`mWindowManager`
/** Retrieve the window manager for showing custom windows. */
public WindowManager getWindowManager() {
    return mWindowManager;
}
还记得这个mWindowManager是来自于哪儿吗?是了,这是Activity.attach()的时候,获取的mWindow中的WindowManager。可以去翻翻上面attach()的代码瞧瞧。
好,事情似乎已经来到了最后一步,就是WindowManager.addView()了,下一节我们看看WindowManager是如何将DecorView添加到Window上的。
权倾朝野 - WindowManager
WindowManager,听起来就很高大上,Window中所有内容的生死大权,都掌握在它的手里。
而实际上它只是一个接口,并不是一个类。继承自ViewManager。
// WindowManager.java

/**
 * 一个接口,app 们用来与window manager通讯的。
 *
 * 每一个window manager的实例都与一个特定的 Display 绑定。要获取不同的 Display 的 WindowManager,
 * 调用 Context.createDisplayContext() 来获取那个 Display 的 Context,然后用
 * Context.getSystemService(Context.WINDOW_SERVICE) 来获取它的 WindowManager。
 *
 * 最简单的在其他 Display 上显示 window 的方法是创建一个 Presentation,Presentation 会自动地为
 * 这个 Display 获取 WindowManager 和 Context。
 *
 * 这个类的主要作用,是与WindowManagerService打交道,将App与WindowManagerService连接在一起。
 *
 */
@SystemService(Context.WINDOW_SERVICE)
public interface WindowManager extends ViewManager {
}
然后是ViewManager类,很简单:
// ViewManager.java

/**
  * 这个接口能让你为Activity添加和删除子view。要获取该类的实例,调用Context.getSystemService()。
  */
public interface ViewManager
{
    public void addView(View view, ViewGroup.LayoutParams params);
    public void updateViewLayout(View view, ViewGroup.LayoutParams params);
    public void removeView(View view);
}
为了方便解释下面的内容,我们还是再贴一次Activity.attach()的部分代码:
// Activity.java

final void attach(Context context, ActivityThread aThread,
        Instrumentation instr, IBinder token, int ident,
        Application application, Intent intent, ActivityInfo info,
        CharSequence title, Activity parent, String id,
        NonConfigurationInstances lastNonConfigurationInstances,
        Configuration config, String referrer, IVoiceInteractor voiceInteractor,
        Window window, ActivityConfigCallback activityConfigCallback, IBinder assistToken) {
    ...
     mWindow.setWindowManager(
            (WindowManager)context.getSystemService(Context.WINDOW_SERVICE),
            mToken, mComponent.flattenToString(),
            (info.flags & ActivityInfo.FLAG_HARDWARE_ACCELERATED) != 0);
    if (mParent != null) {
        mWindow.setContainer(mParent.getWindow());
    }
    mWindowManager = mWindow.getWindowManager();
    ...
其实第一次看到这里的时候,我有点疑惑,为啥不直接通过这种方式来设置mWindow的WindowManager呢?
mWindowManager = (WindowManager)context.getSystemService(Context.WINDOW_SERVICE);
mWindow.setWindowManager(mWindowManager, mToken, mComponent.flattenToString(),
            (info.flags & ActivityInfo.FLAG_HARDWARE_ACCELERATED) != 0);
这样就不必再搞个mWindowManager = mWindow.getWindowManager()出来了啊?
事实证明,我还是Too young, sometimes to naive。我们来看看mWindow.setWindowManager()干了些啥,就知道为啥我的方法行不通了:
// Window.java

/**
    * Set the window manager for use by this Window to, for example,
    * display panels.  This is <em>not</em> used for displaying the
    * Window itself -- that must be done by the client.
    *
    * @param wm The window manager for adding new windows.
    */
public void setWindowManager(WindowManager wm, IBinder appToken, String appName,
        boolean hardwareAccelerated) {
    mAppToken = appToken;
    mAppName = appName;
    mHardwareAccelerated = hardwareAccelerated;
    // 这里还来了个双重保险
    if (wm == null) {
        wm = (WindowManager)mContext.getSystemService(Context.WINDOW_SERVICE);
    }
    mWindowManager = ((WindowManagerImpl)wm).createLocalWindowManager(this);
}
这一着狸猫换太子真是有够妙!这哪里是个简单的 setter 方法啊!
原来这个WindowManager并不是通过系统提供的getSystemService()方法搞出来的实例,而是又自己想办法搞了个新的玩意出来!
先将WindowManager强转成它的一个实现类WindowManagerImpl,然后调用了它的createLocalWindowManager(Window)方法,将WindowManager直接实例化成了WindowManagerImpl。
而createLocalWindowManager()方法里则是简单到不能再简单的一句代码:
public WindowManagerImpl createLocalWindowManager(Window parentWindow) {
    return new WindowManagerImpl(mContext, parentWindow);
}
说白了,这个mWindowManager与(WindowManager)mContext.getSystemService(Context.WINDOW_SERVICE)压根就不是同一个实例,它是新new出来的一个WindowManagerImpl实例。
这下好了,冤有头债有主,这下我们可知道addView()最终是由谁来实现了,就是这个WindowManagerImpl类。来看看它的代码:
// WindowManagerImpl.java

public final class WindowManagerImpl implements WindowManager {
    ...
    private final WindowManagerGlobal mGlobal = WindowManagerGlobal.getInstance();
    ...
    @Override
    public void addView(@NonNull View view, @NonNull ViewGroup.LayoutParams params) {
        applyDefaultToken(params);
        mGlobal.addView(view, params, mContext.getDisplay(), mParentWindow);
    }
}
WindowManagerGlobal是单例模式,看来是要与很多WindowManagerImpl的实例进行沟通。而且在调用addView()时,所以的要素全有了:
- 要添加的View
- 该View的LayoutParams
- Display(也即要显示的屏幕)
- 要添加到的Window(也即PhoneWindow实例)
万事俱备只欠东风,我们来看看WindowManagerGlobal.addView()最后是如何把View添加到Window上的吧!
// WindowManagerGlobal.java

public void addView(View view, ViewGroup.LayoutParams params,
        Display display, Window parentWindow) {
    // 各种null检查
    ...

    final WindowManager.LayoutParams wparams = (WindowManager.LayoutParams) params;
    if (parentWindow != null) {
        // 如果当前窗口需要被添加为另一个窗口的附属窗口(子窗口),则需要父窗口视自己的情况对当前窗口的布局参数进行调整
        parentWindow.adjustLayoutParamsForSubWindow(wparams);
    }

    // 又是一个相当重要的类,后面会详细讲
    ViewRootImpl root;
    View panelParentView = null;

    // 因为是单例的Global类,所以线程同步非常重要
    synchronized (mLock) {
        ...
        // If this is a panel window, then find the window it is being
        // attached to for future reference.
        if (wparams.type >= WindowManager.LayoutParams.FIRST_SUB_WINDOW &&
                wparams.type <= WindowManager.LayoutParams.LAST_SUB_WINDOW) {
            final int count = mViews.size();
            for (int i = 0; i < count; i++) {
                if (mRoots.get(i).mWindow.asBinder() == wparams.token) {
                    panelParentView = mViews.get(i);
                }
            }
        }

        root = new ViewRootImpl(view.getContext(), display);  // 1

        view.setLayoutParams(wparams);

        mViews.add(view);
        mRoots.add(root);
        mParams.add(wparams);

        // do this last because it fires off messages to start doing things
        try {
            // 将作为窗口的控件设置给ViewRootImpl.这个动作将导致ViewRootImpl向WMS添加新的窗口、
            // 申请Surface以及托管控件在Surface上的重绘工作,
            // 这才是真正意义上完成了窗口的添加工作。
            root.setView(view, wparams, panelParentView);  // 2
        } catch (RuntimeException e) {
            // BadTokenException or InvalidDisplayException, clean up.
            if (index >= 0) {
                removeViewLocked(index, true);
            }
            throw e;
        }
    }


    public void updateViewLayout(View view, ViewGroup.LayoutParams params) {
        if (view == null) {
            throw new IllegalArgumentException("view must not be null");
        }
        if (!(params instanceof WindowManager.LayoutParams)) {
            throw new IllegalArgumentException("Params must be WindowManager.LayoutParams");
        }

        final WindowManager.LayoutParams wparams = (WindowManager.LayoutParams)params;

        view.setLayoutParams(wparams);

        synchronized (mLock) {
            int index = findViewLocked(view, true);
            ViewRootImpl root = mRoots.get(index);
            mParams.remove(index);
            mParams.add(index, wparams);
            root.setLayoutParams(wparams, false);
        }
    }

    @UnsupportedAppUsage
    public void removeView(View view, boolean immediate) {
        if (view == null) {
            throw new IllegalArgumentException("view must not be null");
        }

        synchronized (mLock) {
            int index = findViewLocked(view, true);
            View curView = mRoots.get(index).getView();
            removeViewLocked(index, immediate);
            if (curView == view) {
                return;
            }

            throw new IllegalStateException("Calling with view " + view
                    + " but the ViewAncestor is attached to " + curView);
        }
    }
}
我们能看出,WindowManagerGlobal的职责如下:
- 统一管理整个进程中所有窗口的信息。包括控件、布局参数以及ViewRootImpl这三个元素。
- WindowManagerGlobal将窗口的创建、销毁、布局更新等任务交给了ViewRootImpl完成。
根据的1和2两句代码,又引出了一个非常重要的类——ViewRootImpl。关于它,我们得单开一篇文章来讲讲。这里只简单带过一下:
// ViewRootImpl.java

/**
 * View 层级的最顶端,在View和WindowManager实现了一些必要的协议。这个类是WindowManagerGlobal
 * 的大部分内部详细实现。
 */

@SuppressWarnings({"EmptyCatchBlock", "PointlessBooleanExpression"})
public final class ViewRootImpl implements ViewParent,
        View.AttachInfo.Callbacks, ThreadedRenderer.DrawCallbacks {
    ...
    // 这个类是建立硬件输入设备与软件关联的一个类,
    // 也是窗口接收来自 InputDispatcher 的输入事件的管道
    InputChannel mInputChannel;

    // WindowInputEventReceiver 用于接收输入设备的输入事件,重要的事件回调在其 onInputEvent(InputEvent) 方法中
    WindowInputEventReceiver mInputEventReceiver;

    IWindowSession mWindowSession;

    public ViewRootImpl(Context context, Display display) {
        ...
        // 从 WindowManagerGlobal 中获取一个IWindowSession的实例。
        // 它是ViewRootImpl和 WindowManagerService(以下简称WMS)进行通信的代理
        mWindowSession = WindowManagerGlobal.getWindowSession();
        ...
    }

    // FallbackEventHandler是一个处理未经任何人消费的输入事件的场所.
    mFallbackEventHandler = new PhoneFallbackEventHandler(context);
    ...
     /**
     * We have one child
     */
    public void setView(View view, WindowManager.LayoutParams attrs, View panelParentView) {
        synchronized (this) {
            if (mView == null) {
                mView = view;  // 将传入的 DecorView 保存到 mView
                ...
                mFallbackEventHandler.setView(view);
                ...
                int res; /* = WindowManagerImpl.ADD_OKAY; */
                /**
                 * 在添加窗口之前,先通过requestLayout方法在主线程上安排一次『遍历』。
                 * 所谓『遍历』是指ViewRootImpl中的核心方法performTraversal()。
                 * 这个方法实现对控件树进行measure、layout、向WMS申请修改窗口属性以及重绘的所有工作。
                 */
                requestLayout();

                // 此处新建了 InputChannel 的实例,但并未进行初始化,而是直接将给了 WindowSession 去进行初始化。
                // 这也标志着在当前 Window 和 InputManagerService 中间,正式建立了接受设备事件的通道。
                if ((mWindowAttributes.inputFeatures
                        & WindowManager.LayoutParams.INPUT_FEATURE_NO_INPUT_CHANNEL) == 0) {

                    mInputChannel = new InputChannel();
                }
                ...
                try {
                    ...
                    /**
                     *上文刚讲过 mWindowSession 是个 Binder 类,它的实现类是 Session,
                     * 将通过 IPC 远程调用(即调用另一个进程中的)Session 的 addToDisplay 方法把窗口添加进WMS中。
                     * 完成这个操作后,mWindow 已经被添加到指定对象中而且 mInputChannel(如果不为空)已经准备好接收事件
                     * 只是由于这个窗口没有进行过relayout(),因此它还没有有效的Surface可以进行绘制
                     */
                    res = mWindowSession.addToDisplay(mWindow, mSeq, mWindowAttributes,
                            getHostVisibility(), mDisplay.getDisplayId(), mTmpFrame,
                            mAttachInfo.mContentInsets, mAttachInfo.mStableInsets,
                            mAttachInfo.mOutsets, mAttachInfo.mDisplayCutout, mInputChannel,
                            mTempInsets);
                } catch (RemoteException e) {
                    ...
                } finally {
                    ...
                }
                ...
                // 如果mInputChannel不为空,则创建mInputEventReceiver,用于接受输入事件。
                // 注意第二个参数传递的是Looper.myLooper(),即 mInputEventReceiver 将在主线程上
                // 触发输入事件的读取与 onInputEvent()。这是应用程序可以在 onTouch() 等事件响应中
                // 直接进行UI操作等根本原因。
                if (mInputChannel != null) {
                    ...
                    mInputEventReceiver = new WindowInputEventReceiver(mInputChannel,
                            Looper.myLooper());
                }
                ...
                view.assignParent(this);
                ...
            }
        }
    }
}
接着分析代码可以看到mWindowSession的类型是:IWindowSession,并且是通过WindowManagerGlobal.getWindowSession()初始化的:
public static IWindowSession getWindowSession() {
    synchronized (WindowManagerGlobal.class) {
        if (sWindowSession == null) {
            try {
                InputMethodManager imm = InputMethodManager.getInstance();
                IWindowManager windowManager = getWindowManagerService();
                sWindowSession = windowManager.openSession(
                        new IWindowSessionCallback.Stub() {
                            @Override
                            public void onAnimatorScaleChanged(float scale) {
                                ValueAnimator.setDurationScale(scale);
                            }
                        },
                        imm.getClient(), imm.getInputContext());
            } catch (RemoteException e) {
                throw e.rethrowFromSystemServer();
            }
        }
        return sWindowSession;
    }
}
而getWindowSession方法里,则是跨进程调用openSession方法获取,我们来看看WindowManagerService里的openSession方法:
public class WindowManagerService extends IWindowManager.Stub implements Watchdog.Monitor, WindowManagerPolicy.WindowManagerFuncs {
    @Override
    public IWindowSession openSession(IWindowSessionCallback callback, IInputMethodClient client,
            IInputContext inputContext) {
        if (client == null) throw new IllegalArgumentException("null client");
        if (inputContext == null) throw new IllegalArgumentException("null inputContext");
        Session session = new Session(this, callback, client, inputContext);
        return session;
    }
}
于是这里的window被交给了IWindowSession.aidl的实现类Session中:
// Session.java

/**
 * 这个类代表了一个
 * This class represents an active client session.  There is generally one
 * Session object per process that is interacting with the window manager.
 */
class Session extends IWindowSession.Stub implements IBinder.DeathRecipient {

    @Override
    public int addToDisplay(IWindow window, int seq, WindowManager.LayoutParams attrs,
            int viewVisibility, int displayId, Rect outFrame, Rect outContentInsets,
            Rect outStableInsets, Rect outOutsets,
            DisplayCutout.ParcelableWrapper outDisplayCutout, InputChannel outInputChannel,
            InsetsState outInsetsState) {
        return mService.addWindow(this, window, seq, attrs, viewVisibility, displayId, outFrame,
                outContentInsets, outStableInsets, outOutsets, outDisplayCutout, outInputChannel,
                outInsetsState);
    }
}
此处的mService自然就是WindowManagerService喽,也就是绕完一圈,还是把addWindow()的工作交给了WindowManagerService。我们来看看WindowManagerService里是怎样添加Window的:
final WindowHashMap mWindowMap = new WIndowHashMap();
public int addWindow(Session session, IWindow client, int seq,
            LayoutParams attrs, int viewVisibility, int displayId, Rect outFrame,
            Rect outContentInsets, Rect outStableInsets, Rect outOutsets,
            DisplayCutout.ParcelableWrapper outDisplayCutout, InputChannel outInputChannel,
            InsetsState outInsetsState) {
    ...
    WindowState parentWindow = null;
    ...
    synchronized (mGlobalLock) {
        ...
        final WindowState win = new WindowState(this, session, client, token, parentWindow,
                    appOp[0], seq, attrs, viewVisibility, session.mUid,
                    session.mCanAddInternalSystemWindow);
        ...
        // From now on, no exceptions or errors allowed!
        ...
        win.attach();
        mWindowMap.put(client.asBinder(), win);
        win.initAppOpsState();
    }
}
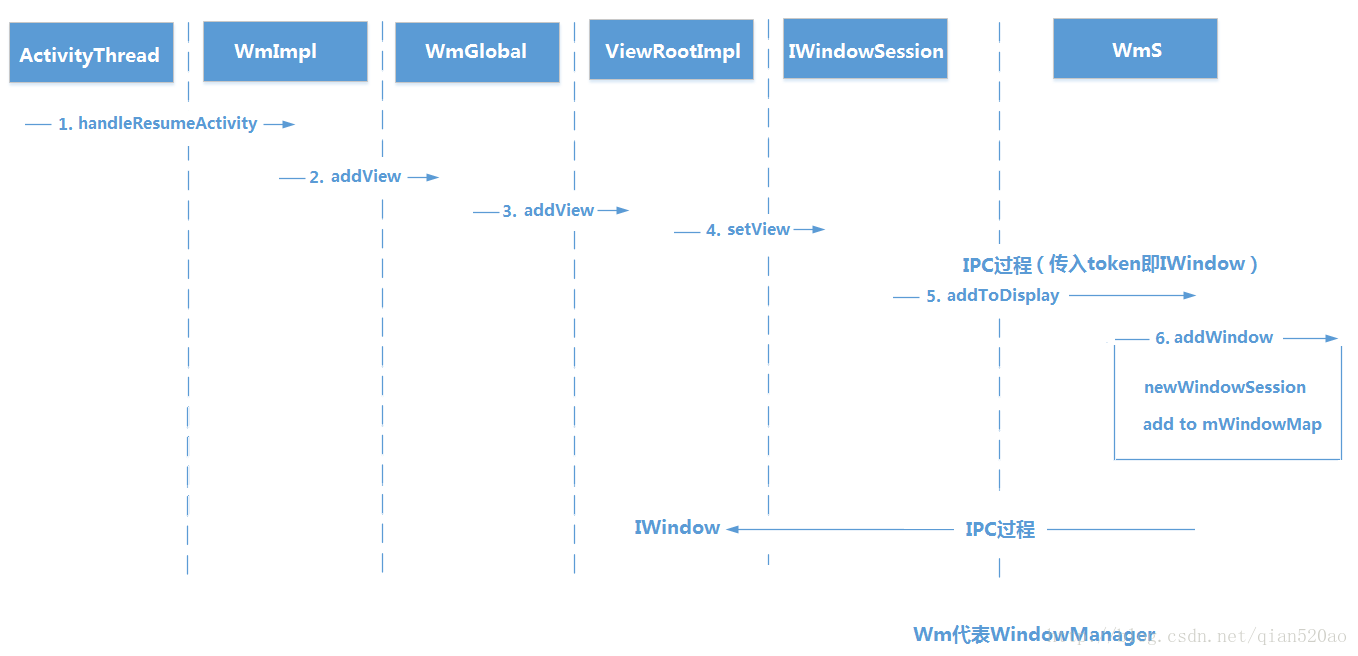
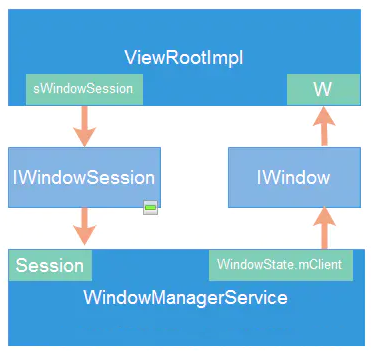
刚才从ViewRootImpl开始,直到这里添加Window结束,整个流程可以归结为下面二图:
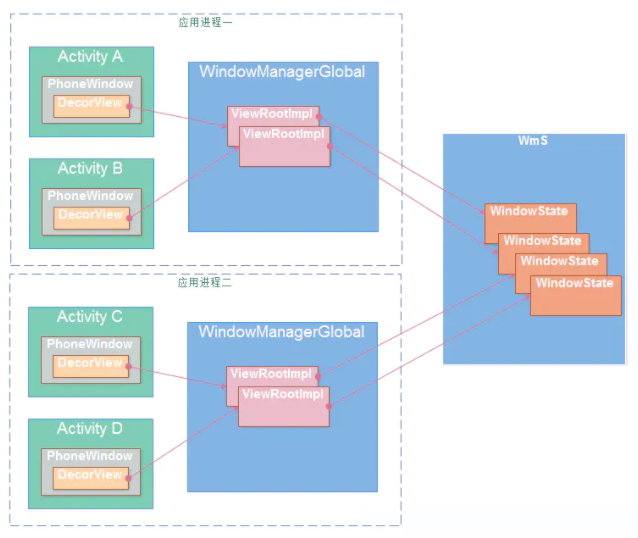
如此一来,Window的添加请求就交给WMS去处理了,在WMS内部会为每一个应用保留一个单独的Session。在 WMS 端会创建一个WindowState对象用来表示当前添加的窗口。 WMS负责管理这里些 WindowState 对象。至此,Window的添加过程就结束了。
至于Window的删除和更新过程,举一反三,也是使用WindowManagerGlobal对ViewRootImpl的操作,最终也是通过Session的IPC跨进程通信通知到WMS。整个过程的本质都是同出一辙的。
至此,从Activity的创建,到内容显示在屏幕上,已经基本完成,背后的工作还需要交给WindowServiceManager以及硬件层面的一此工作,也就不在我们的讨论范围里了。
最后再来一张整体的流程图,我们再梳理一下: